
Job Reports
Scheduling is the process of arranging, controlling, and optimizing work and workloads. Scheduling is used to allocate service resources, plan job schedules, plan service processes, and purchase materials.
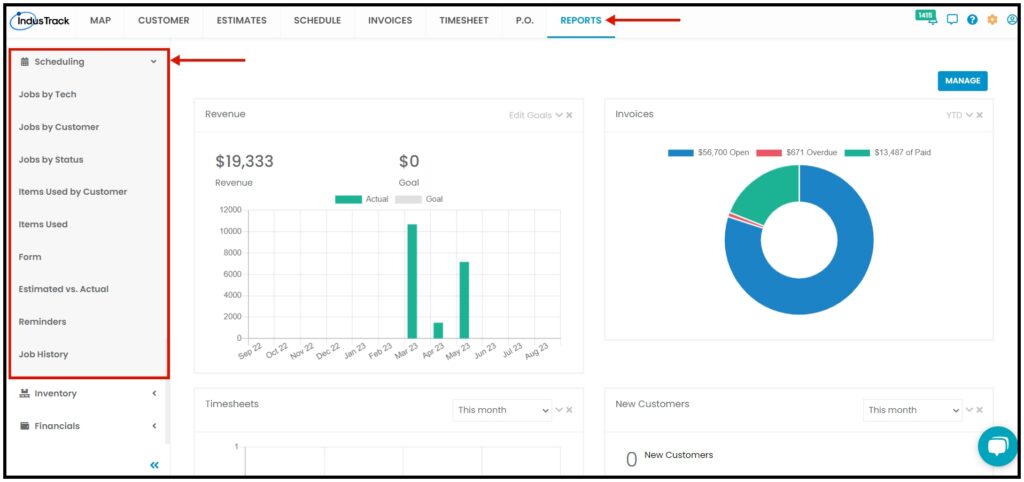
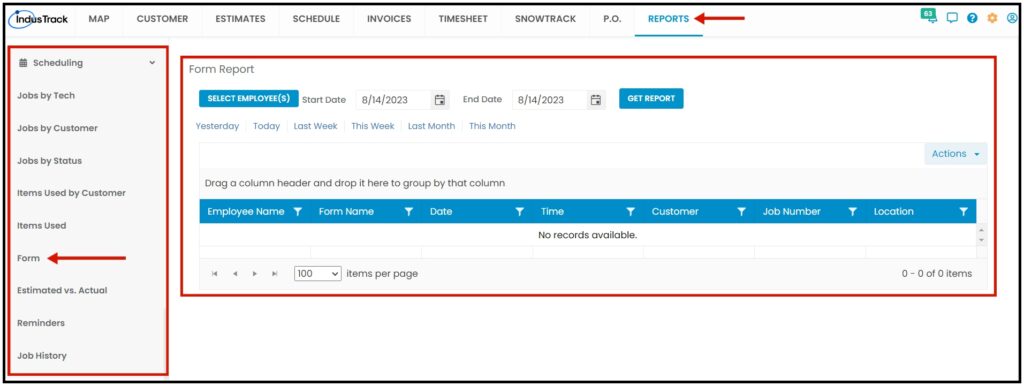
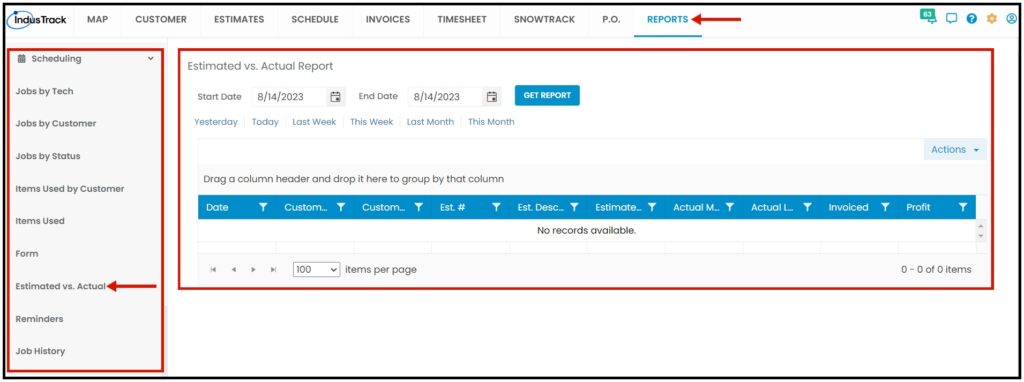
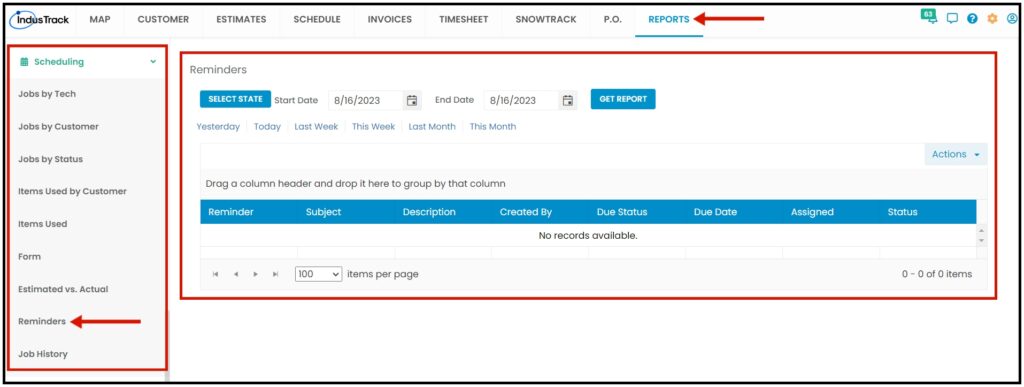
To access Job Reports, click on the Reports Module from the top dashboard> on the left panel, and click Scheduling.
When you click on the drop-down arrow beside Scheduling, it will show its subcategories for the reports that are available:
- Jobs by Tech
- Jobs by Customer
- Jobs by Status
- Items Used by Customer
- Items Used
- Form
- Estimated vs. Actual
- Reminders
- Job History
Jobs by Tech Report
In this report, you can find a detailed report of all the jobs that were assigned or worked by field employees. These are all the details you will be able to find in this Report:
- Customer Name
- Customer Location
- Employee Name
- Job Number
- Service Type
- Status
- In the status, you will be able to determine if the Job has been started, declined, or completed.
- Schedule Date
- The actual date the job was scheduled.
- Schedule Time
- The actual time the job is scheduled.
- Actual Time
- The actual time the field employee started the job.
- Estimated Duration
- The preconfigured duration of how long the job is estimated to be performed.
- Actual Duration
- The actual duration the field employee has finished the job.
- View Detail
- View the Job Detail Report Preview
To view the Jobs by Tech Report, go to Reports Menu on the top> Click Scheduling> on the drop-down click Jobs by Tech Report.

Generate Job by Tech Report
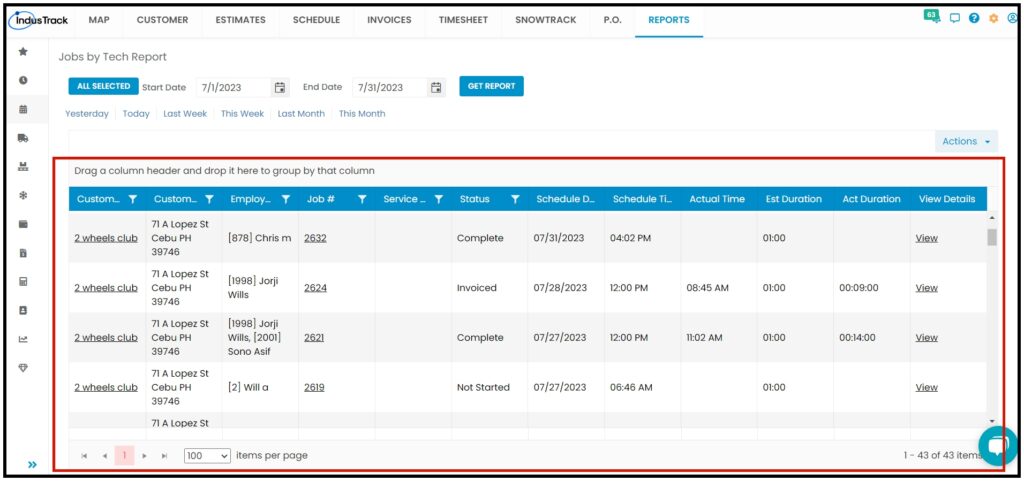
On the Job Report page, you can generate your Field Employees’ Job Reports. Once the Report is generated you will be able to see all the Jobs that were assigned or worked by the selected field employee with all details mentioned above.
To generate a job report:
- On the Job report page, select which field employees‘ job reports you would like to view.
- You can filter field employees by the search bar, on the drop-down, by groups, or select all employees.
- Select a Start Date and End Date– By filtering out the start and end dates, you are filtering out the Schedule date of a Job assigned/worked by the selected field employee.
- After filtering out field employee/s and the Start/End date, click on Get Report.

Alternatively, you can also select a period rather than selecting a specific date. Click on the desired specific period, then click Get Report.
Yesterday | Today | last Week | This Week | Last Month | This Month

After we were able to generate jobs by tech report, you should be able to see all jobs assigned to the employee we filtered out with all of their details.
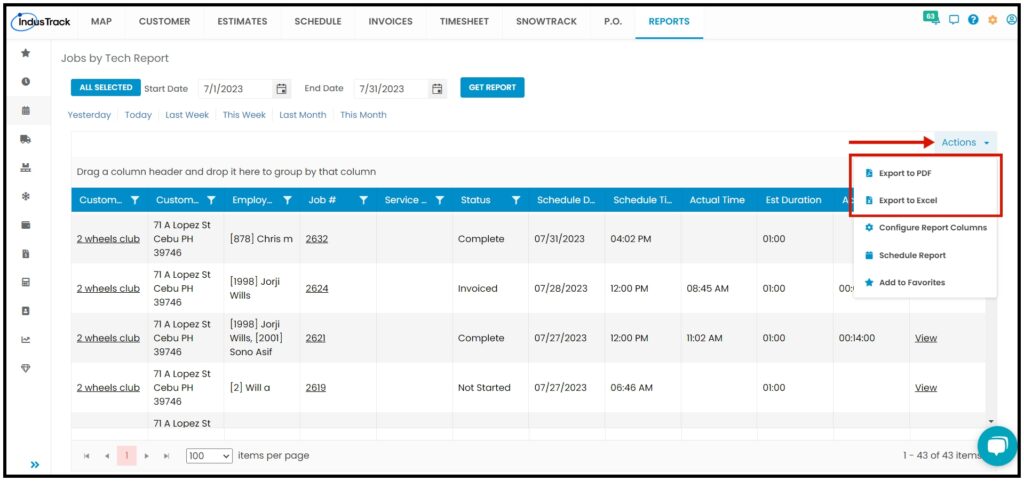
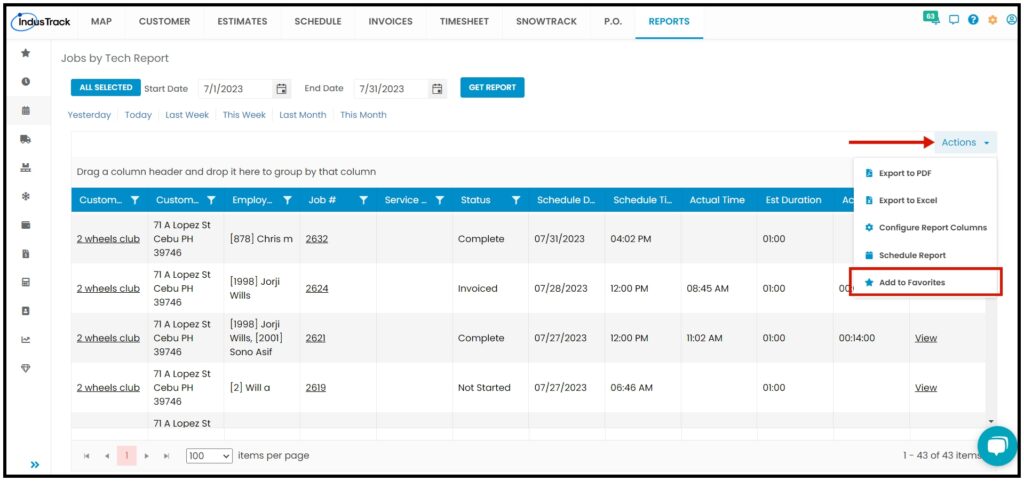
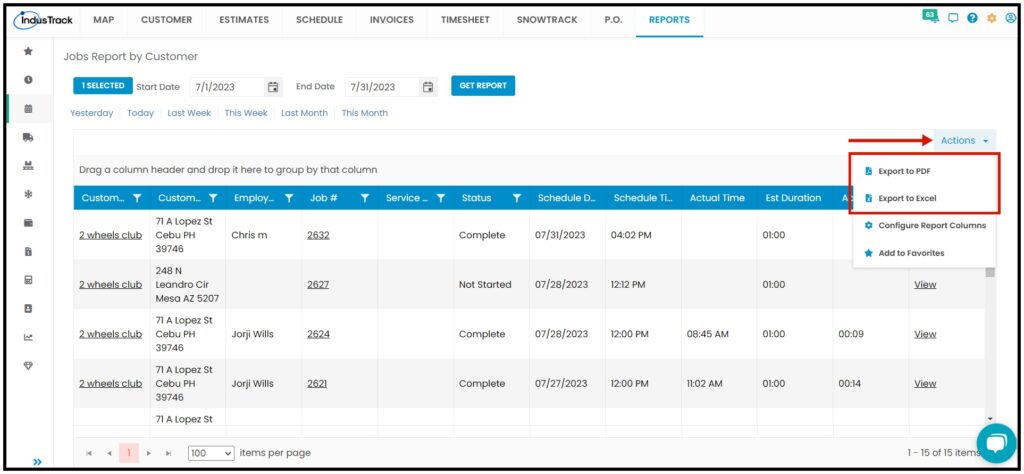
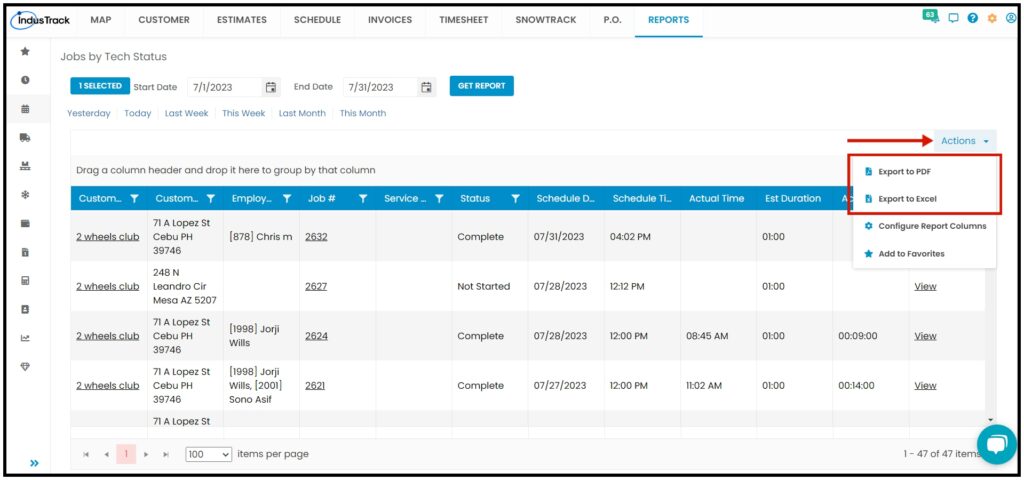
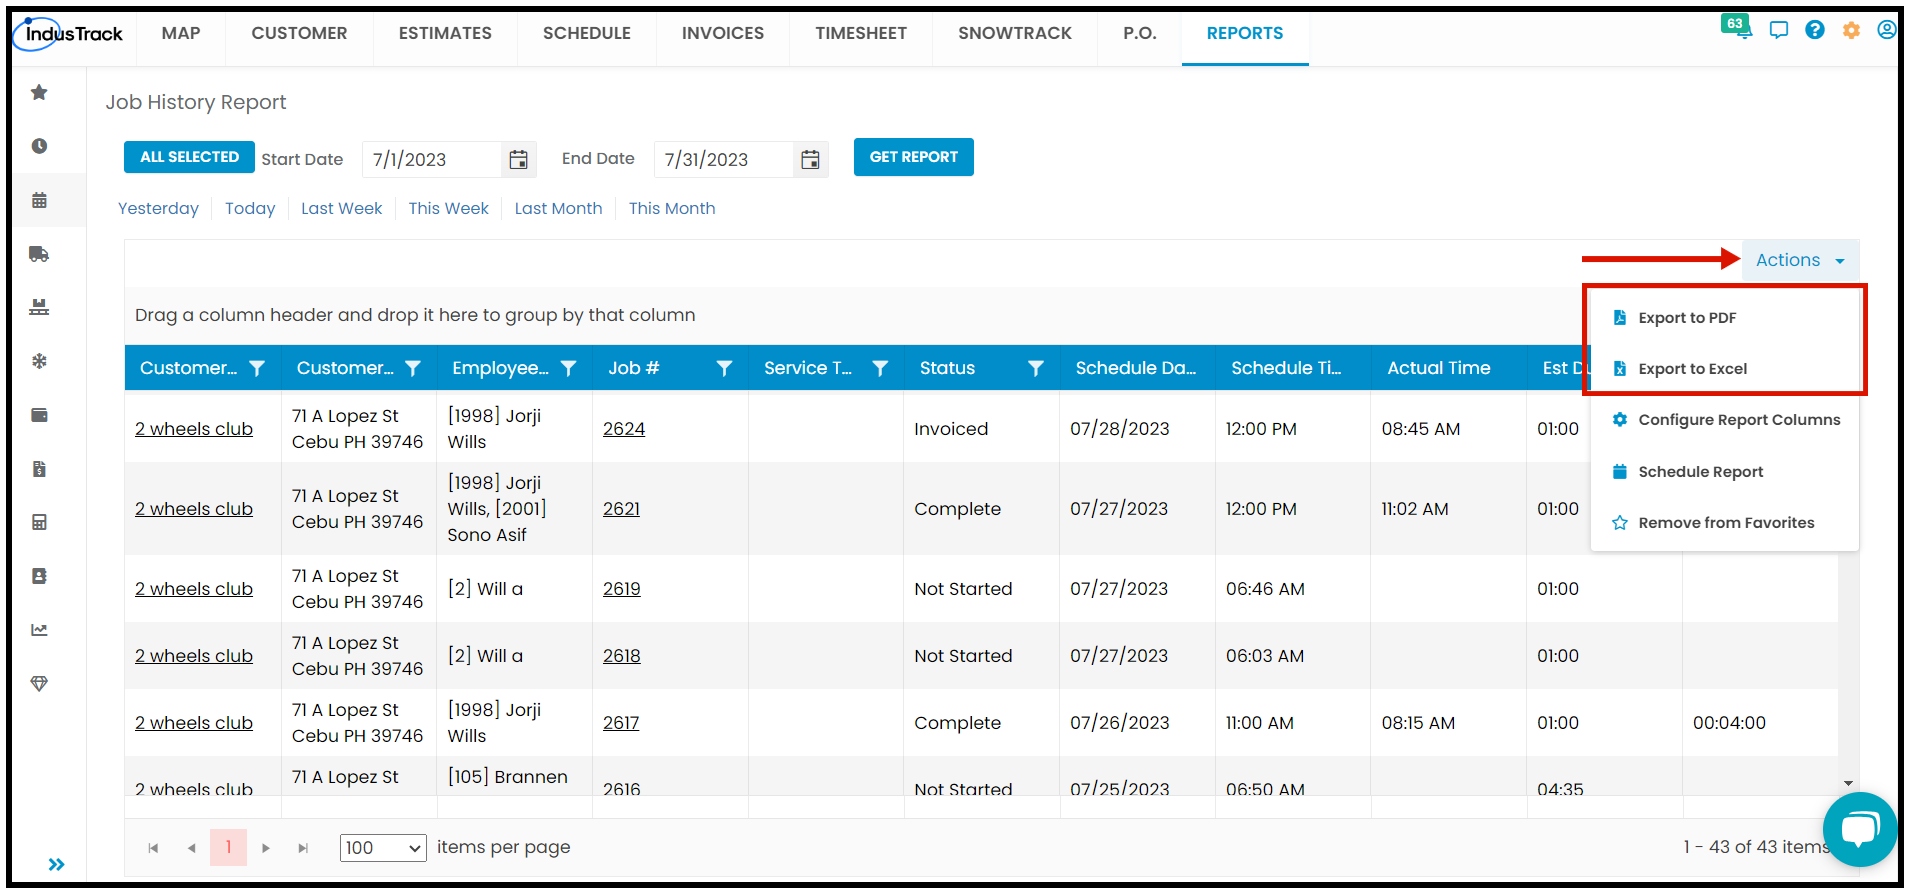
After we click on Get Report, we can now export the Jobs by Tech Report into Excel or PDF format by clicking on the Actions Button.
Actions Button
- Export to PDF
- Export to Excel
- Configure Report Columns
- Schedule Report
- Add to Favorites

Export Report
- Click on export to Excel or export to PDF to download the report to your computer. Either way, you can completely see the details in the report.
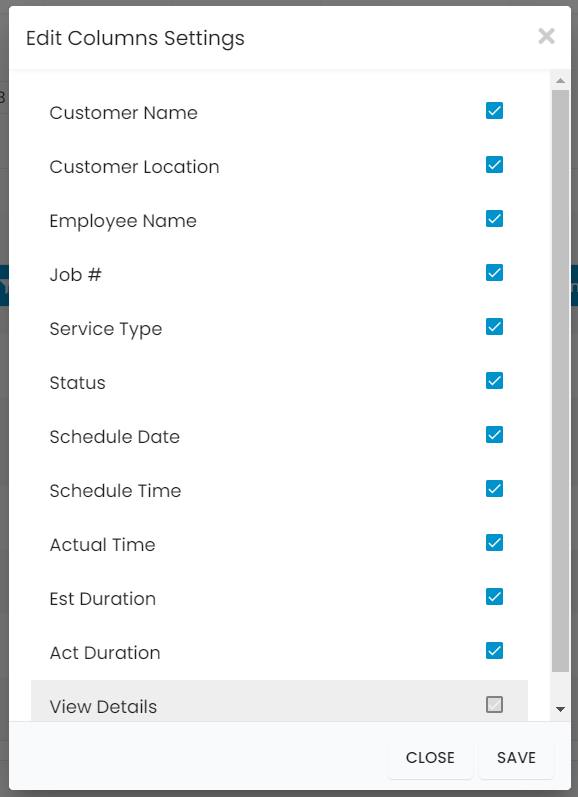
Configure Report Columns
Enable or disable the columns on this report if you want to see them or not. When disabling the column/s, once you generate this report that specific column will be removed.

Uncheck columns you don’t want to see in the Report. Click SAVE after configuring.
Schedule Report
You can also Automatically schedule a report on a specified frequency. Refer to Schedule Report Module.

Add to Favorites
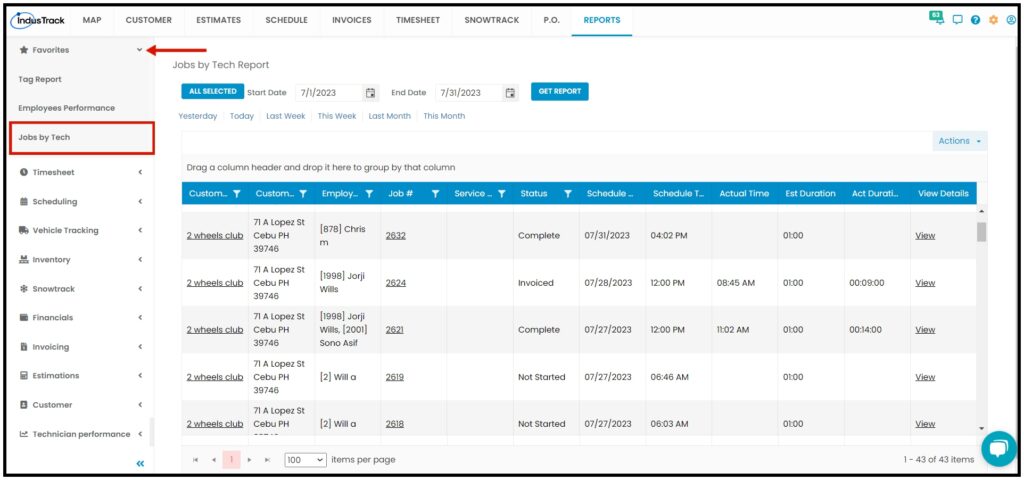
If you are frequently using this Report, you can select and Add it to your Favorites.
After you added a Report to Favorites, a Favorite Tab will be added at the top right of the left panel. All reports that are added to Favorite will be listed in the Top panel for easy access.
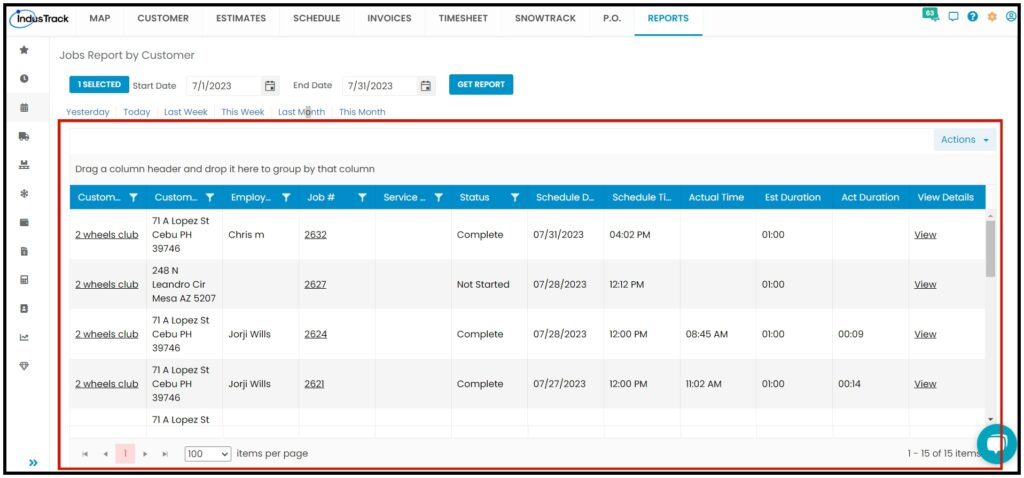
Jobs Report by Customer
- In this report, you can find a summary of all the jobs assigned to a customer in a specific period. These are all the details you will be able to find in this Report:
- Customer Name
- Customer Location
- Employee Name
- Job Number
- Service Type
- Status
- In the status, you will be able to determine if the Job has been started, declined, or completed.
- Schedule Date
- The actual date the job was scheduled.
- Schedule Time
- The actual time the job is scheduled.
- Actual Time
- The actual time the field employee started the job.
- Estimated Duration
- The preconfigured duration of how long the job is estimated to be performed.
- Actual Duration
- The actual duration the field employee has finished the job.
- View Details
- View the Job Detail Report Preview
Access Jobs Report by Customer:
- Click on the Reports Module
- On the left panel, select Scheduling
- On the drop-down, click on Jobs by Customer
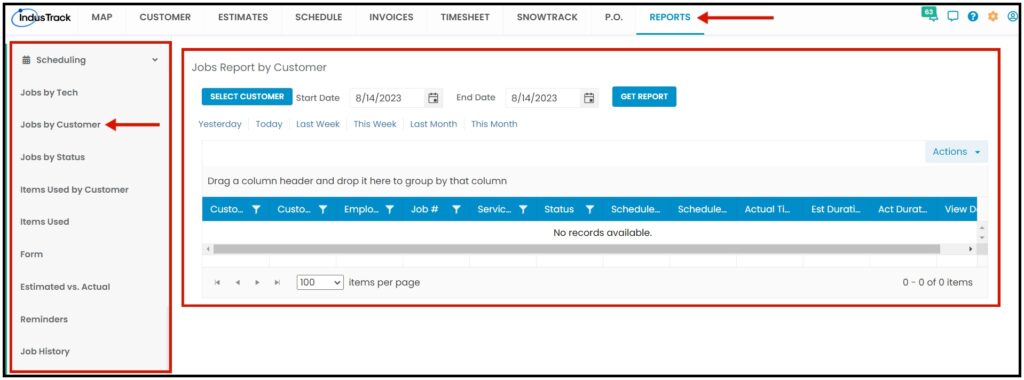
Generate Jobs Report by Customer
On the Jobs Report by Customer page, you can generate all the jobs assigned to a specific customer. Once the Report is generated you will be able to see all the Jobs that were assigned to the selected customer with all details mentioned above.
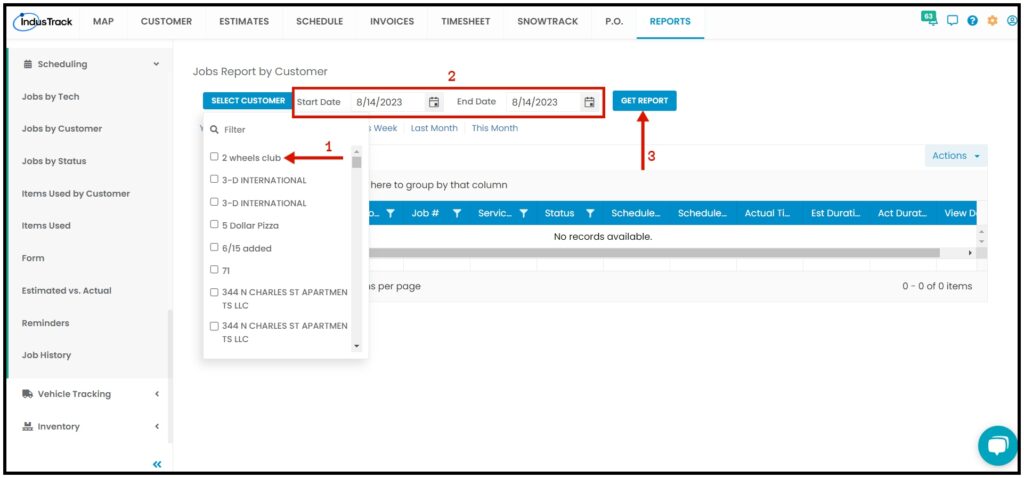
To generate a jobs report by customer:
- On the JobsReport by Customer page, select which customer’s job reports you would like to view.
- You can filter customers by the search bar or on the drop-down. Note that we can only select one customer at a time.
- Select a Start Date and End Date- By filtering out the start and end dates, you are filtering out the Schedule date of a Job assigned to the selected customer.
- After filtering out the customer and the Start/End date, click on Get Report.
After we were able to generate a job report, you should be able to see all jobs for the selected customer we filtered out with all of their details from the employee name, customer name, customer location, job status, etc.
Export Job by Customer Report
After we click on Get Report, we can now export the Jobs Report Customer into Excel or PDF format by clicking on the Actions Button and selecting Export to PDF or Export to Excel.
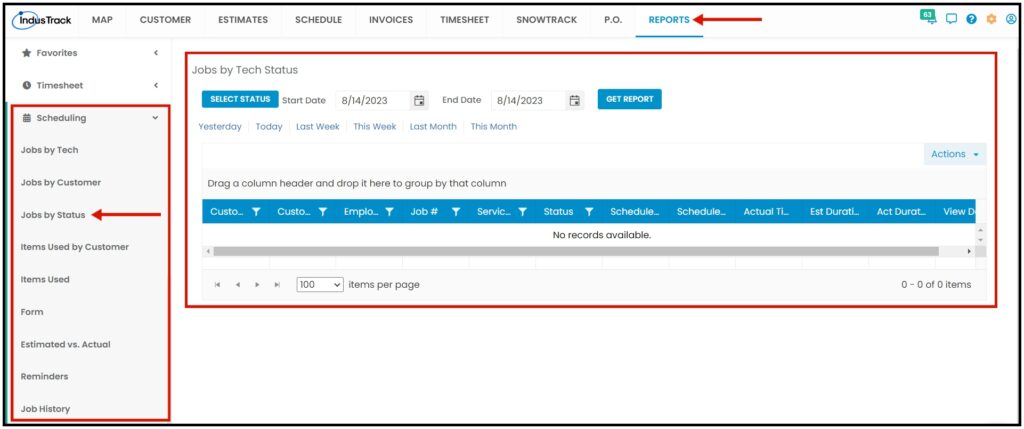
Jobs by Tech Status
In this Report, you will be able to generate all tech’s jobs by their statuses during a specific period with the following information:
- Customer Name
- Customer Location
- Employee Name
- Job #
- Service Type
- Status
- Schedule Date
- Schedule Time
- Actual Time
- Est Duration
- Actual Duration
- View Details
Access Jobs by Tech Status Report:
- Click on the Reports Module
- On the left panel, select Scheduling
- On the drop-down, click on Jobs by Status
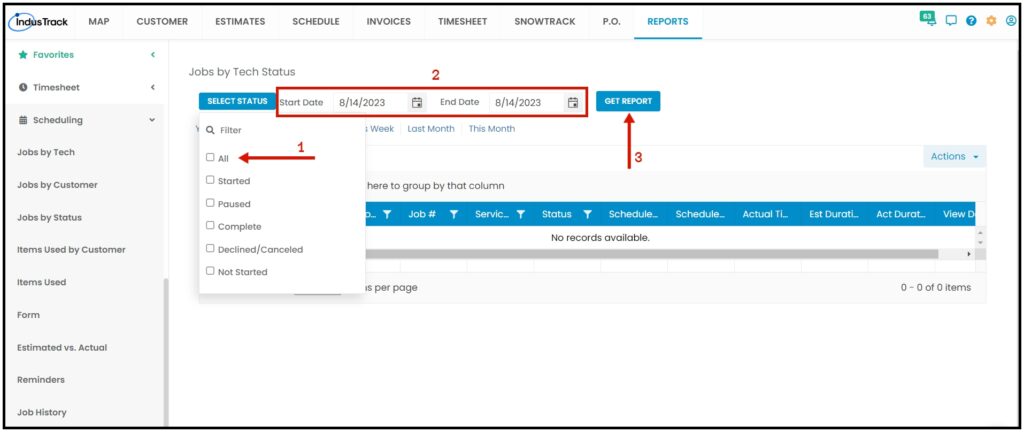
Generate Jobs by Tech Status Report
You can filter the report by the following:
- Status
- Click on Select Statuses (All, Started, Paused, Completed, Declined/Canceled, Not Started)
- You can either select all Statuses or select one status each time.
- Date/s – Job Scheduled Date
- Select the start date and end date
- After you selected the Status and the start and end date, click on Get Report.
After we click on Get Report, we can now export the Jobs by Tech Status Report into Excel or PDF format by clicking on the Actions Button and selecting Export to PDF or Export to Excel.
Items used by Customer
- In this report, you can find a summary of all the items used by customers during a specific period with the following Information:
- Customer Name
- Field Employee Name
- Field Employee ID.
- Date
- Part Name
- Cost
- Price
- Quantity
- Job #
Access Items Used by Customer Report:
- Click on the Reports Module
- On the left panel, select Scheduling
- On the drop-down, click on Items Used by Customer
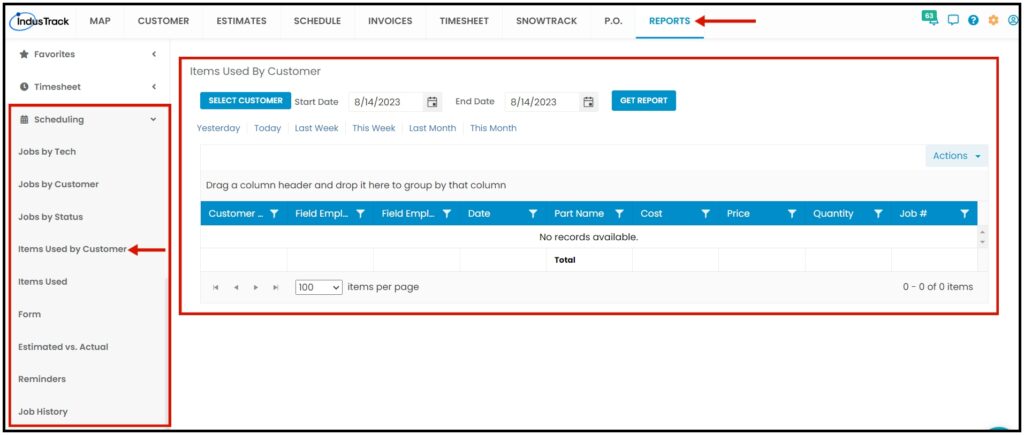
Generate Items Used by Customer Report
On the Items Used by Customer Report page, you can generate all the items used on a job by a certain customer. Once the Report is generated you will be able to see all the items used that were assigned to the selected customer with all details mentioned above.
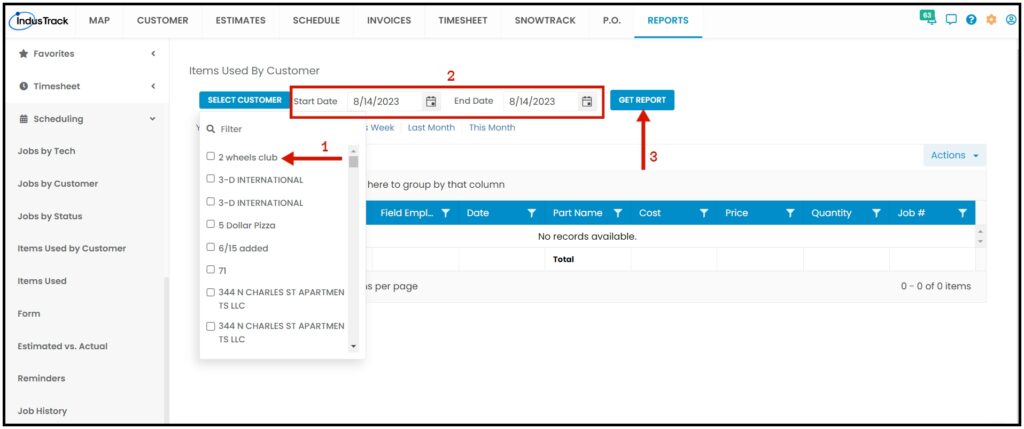
To generate an Items Used by Customer report:
- On the items used by the customer report page, select which customer items used reports you would like to view.
- You can filter customers by the search bar or on the drop-down. Note that we can only select one customer at a time.
- Select a Start Date and End Date- By filtering out the start and end dates, you are filtering out the date of when the items were used by the selected customer.
- After filtering out the customer and the Start/End date, click on Get Report.
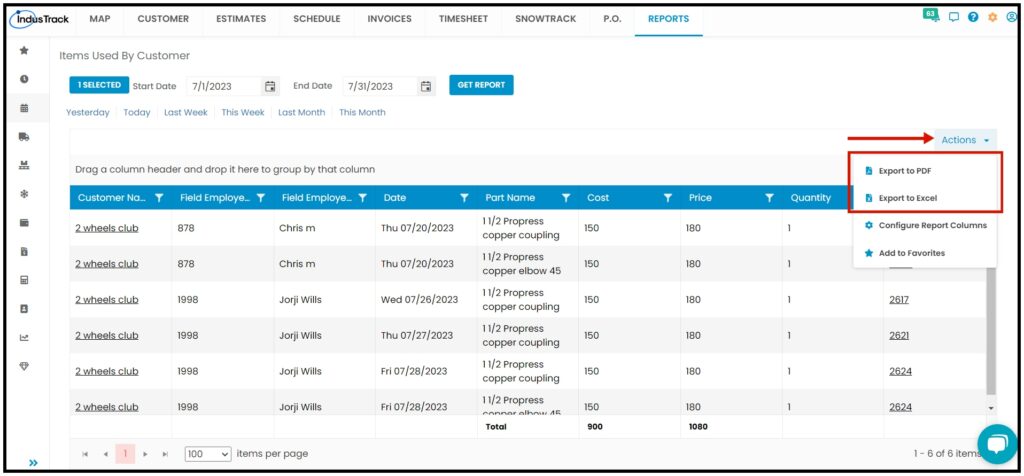
After we were able to generate items used by the customer report, you should be able to see all items used for the selected customer we filtered out with all of their details from the employee name, customer name, item/part name, cost, and price.
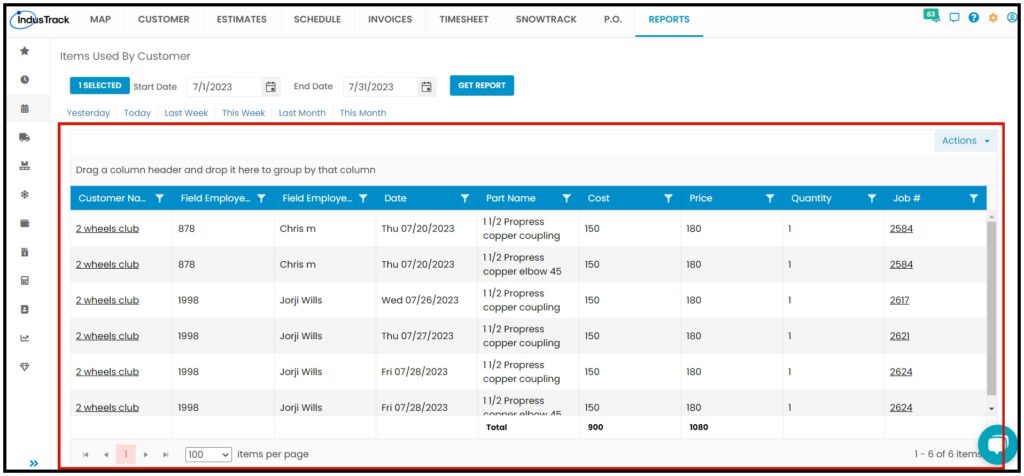
Export Items Used by Customer Report
After we click on Get Report, we can now export the Items Used By Customer Report into Excel or PDF format by clicking on the Actions Button and selecting Export to PDF or Export to Excel.
Items Used
In this report, you can find a summary of all the items used during a specific period of time with the following information:
- Date
- The Date of when the item was used.
- ID
- The SKU of the item.
- Name
- Description
- Price
- Quantity Used
- Quantity on Hand
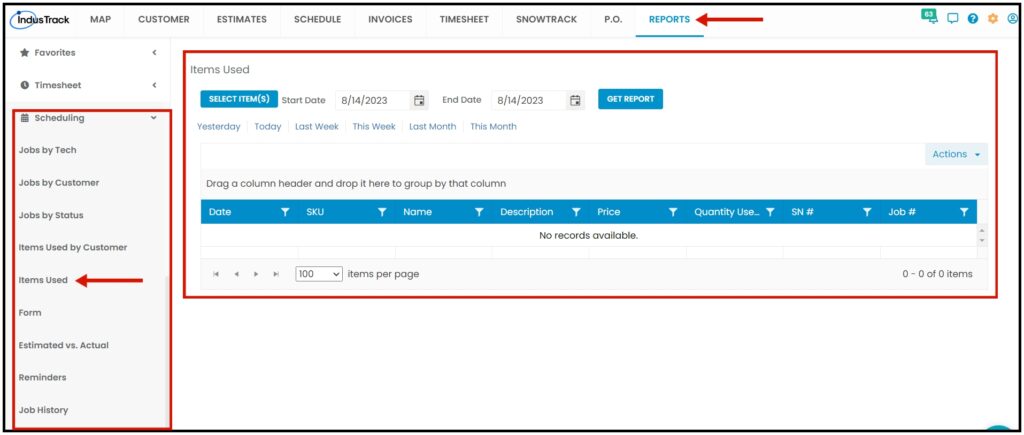
Access Items Used Report:
- Click on the Reports Module
- On the left panel, select Scheduling
- On the drop-down, click on Items Used
Generate Items Used Report
On the Items Used Report page, you can generate all the items used on completed jobs. Once the Report is generated you will be able to see all the items used on a job with all details mentioned above.
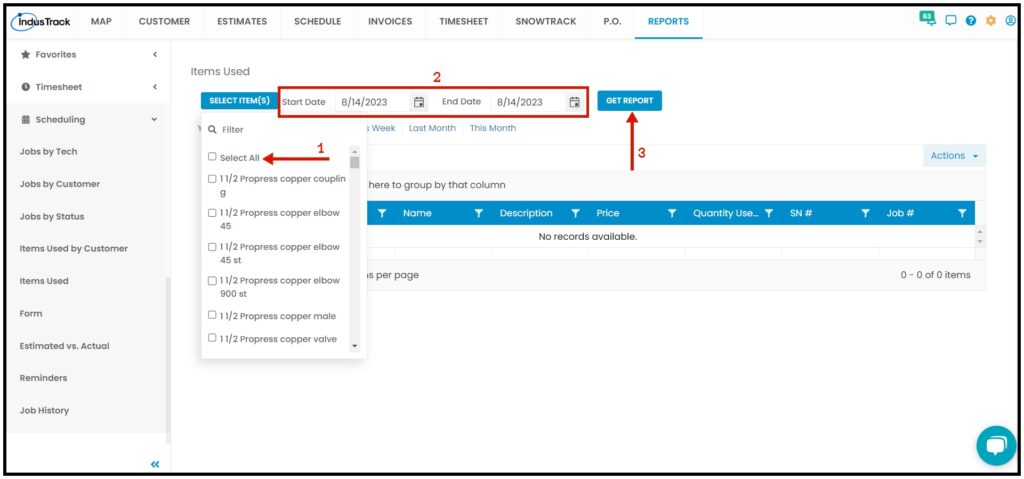
To generate an Items Used report:
- On the items used report page, select items you would like to get the report of that were used on a specific date.
- You can filter items by the search bar, on the drop-down, or select all. You can select multiple items if you want.
- Select a Start Date and End Date- By filtering out the start and end dates, you are filtering out the date when the items were used.
- After filtering out the item/s and the Start/End date, click on Get Report.
After we were able to generate the Items Used report, you should be able to see all items used for the selected date with all of their details from the item name, the date when the item was used, the item description, the price, the quantity used, and on hand.
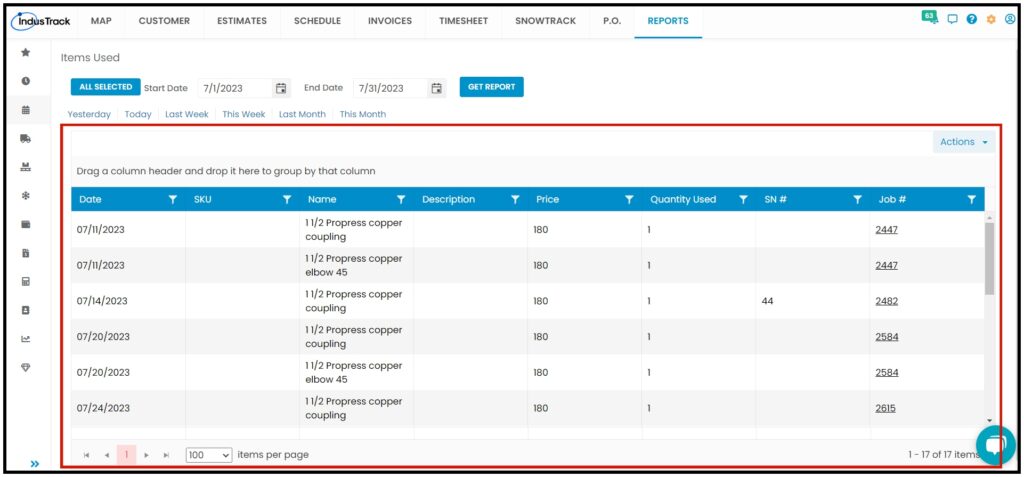
Export Items Used Report
After we click on Get Report, we can now export the Items Used Report into Excel or PDF format by clicking on the Actions Button and selecting Export to PDF or Export to Excel.

Forms Report
In this report, you can find a detailed report of all the submitted electronic forms that were filled out by field employees or customers (depending on the type of form) from a dispatched job. These are all the details you will be able to find in this Report:
- Employee Name
- Name of the field employee who submitted the form.
- Form Name
- Date
- The date of when the form was submitted.
- Time
- The exact time the form was submitted.
- Customer
- Which customer’s job the form was dispatched to.
- Job Number
- Location
- The location of the job where the form was submitted.
Access Forms Report:
- Click on the Reports Module
- On the left panel, select Scheduling
- On the drop-down, click on Forms
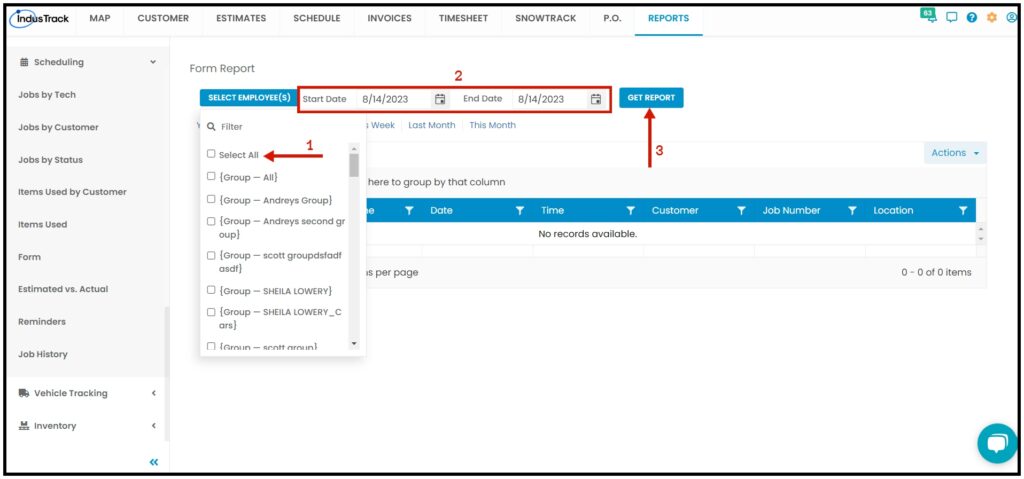
Generate the Form Report
On the Form Report page, you can generate all the submitted forms from dispatched jobs. Once the Report is generated you will be able to see all forms that were used in a job.
- On the Form report page, select which field employees‘ submitted form you would like to view.
- You can filter field employees by the search bar, on the drop-down, by groups, or select all employees.
- Select a Start Date and End Date– By filtering out the start and end dates, you are filtering out the date when the form was submitted.
- After filtering out field employee/s and the Start/End date, click on Get Report.
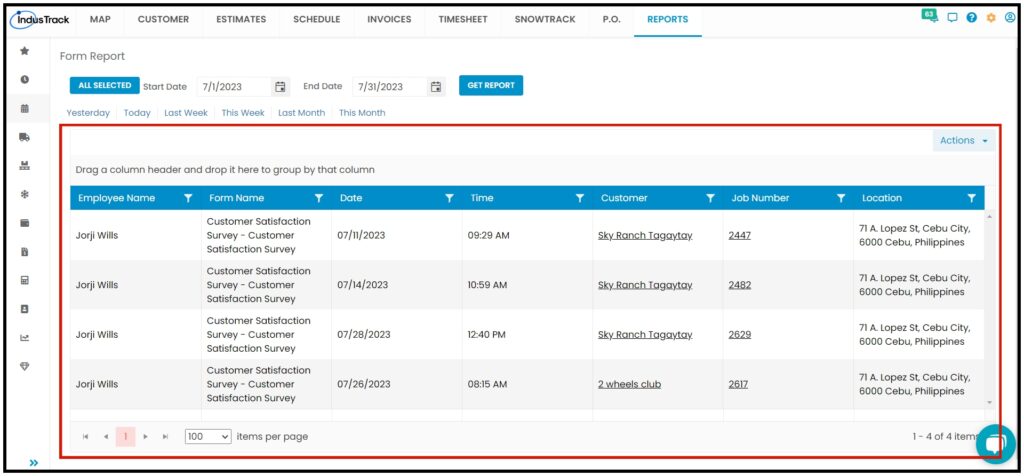
After we were able to generate the Form Report, you should be able to see all the submitted forms with all of their details from the employee name, form name, the date and time when the form was submitted, etc.
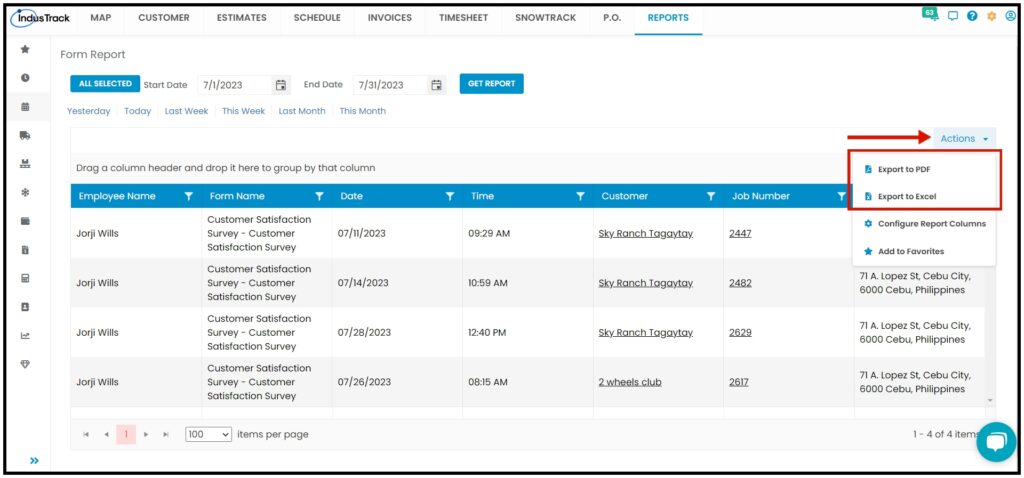
Export Form Report
After we click on Get Report, we can now export the Forms Report into Excel or PDF format by clicking on the Actions Button and selecting Export to PDF or Export to Excel.
Estimated vs Actual Report
- In this report, you can find a summary of all the estimates made versus the actual invoiced on a specific period with the ff. Information:
- Date
- Customer Name and Location
- Estimate No
- Estimate Description
- Estimated
- Actual Material
- Actual Labor
- Invoiced
- Profit
Access Estimated vs Actual Report:
- Click on the Reports Module
- On the left panel, select Scheduling
- On the drop-down, click on Estimated vs Actual
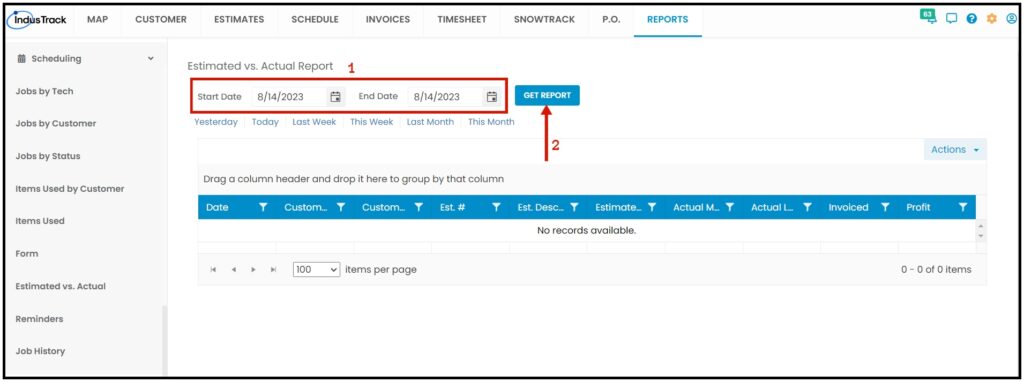
Generate Estimated vs Actual Report
On the Estimated vs Actual Report page, you can generate all customer jobs with details about the estimated cost of materials used and the actual cost of materials used on the job. Once the Report is generated you will be able to see detailed information about the estimated vs actual/invoiced cost of materials used, profit, etc.
- On the Estimated vs Actual page, filter out the Start and End Date. Note that you are filtering out the date of when the customer job was created.
- Click on Get Report.
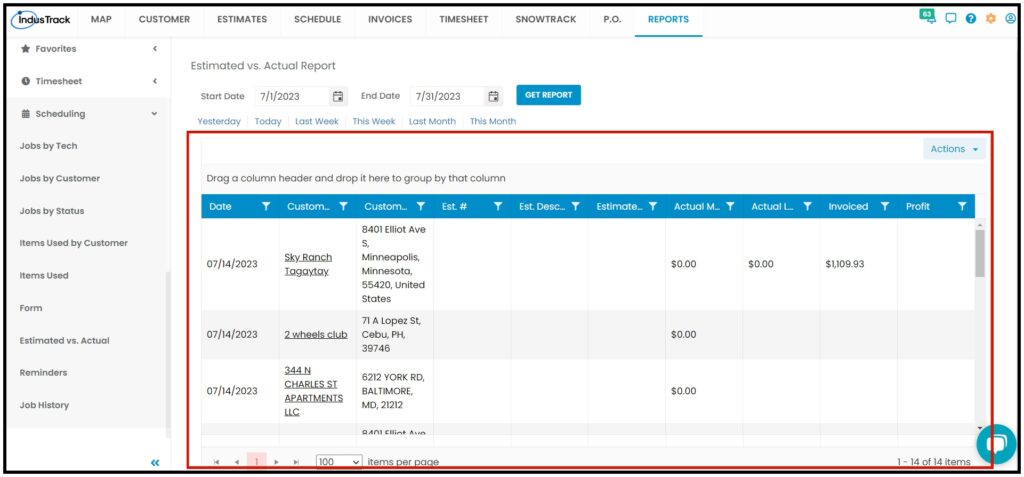
After we were able to generate the Estimated vs Actual Report, you should be able to see the customer’s jobs with details about the estimated cost of materials used vs the actual/ invoiced cost of materials used on the job, the profit gained, etc.
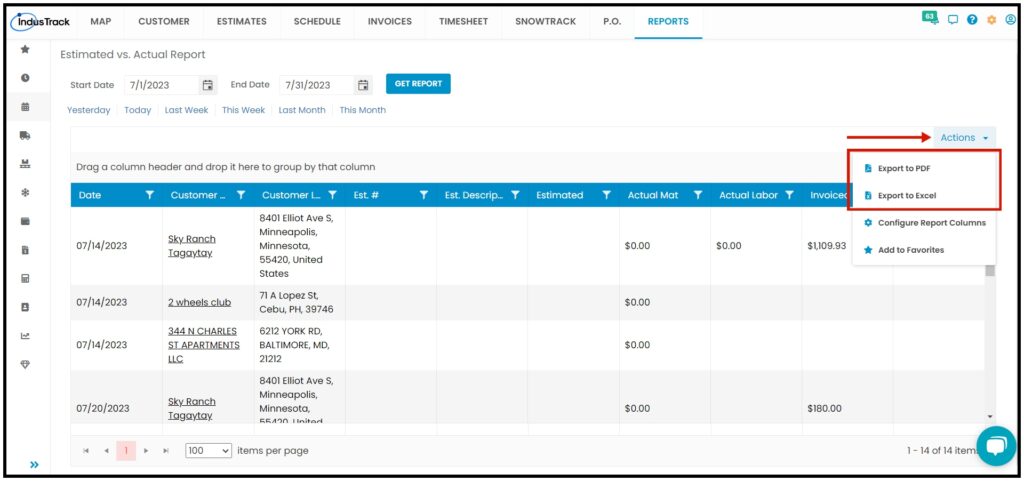
Export Estimated vs Actual Report
After we click on Get Report, we can now export the Estimated vs Actual Report into Excel or PDF format by clicking on the Actions Button and selecting Export to PDF or Export to Excel.
Reminders Report
- In this report, you can find a summary of all your reminders per status; Open, Postponed, Completed, Due Date | Inventory, Jobs, Services, Equipment, Parts; on a specific period with the ff. Information:
- Reminder
- Subject
- Description
- Created by
- Due Date
- Created Date/Time
- Assigned to
- Status
Access Reminders Report:
- Click on the Reports Module
- On the left panel, select Scheduling
- On the drop-down, click on Reminders
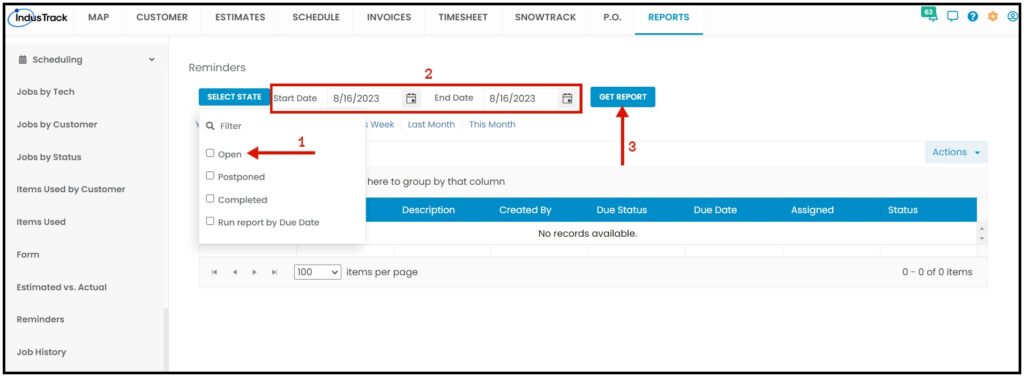
Generate Reminders Report
- You can filter the report by the following:
- State –Current state (Open, Postponed, Completed, Run report by Due Date)
- Click on Select State
- You can SELECT ONE or MORE from the Drop Down Menu
- Date/s – specific date of the report
- Select the start date and end date
- After you selected the state and the start and end date, click Get Report.
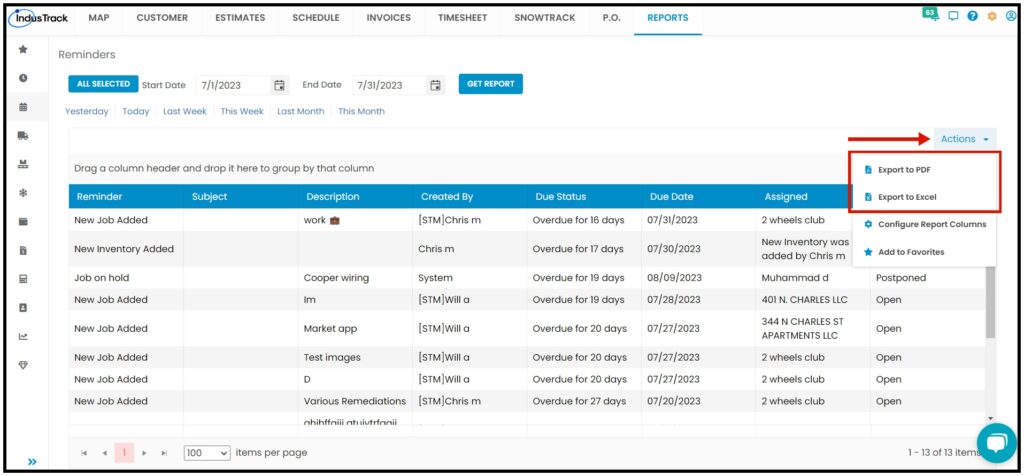
- State –Current state (Open, Postponed, Completed, Run report by Due Date)
Export Reminders Report
After we click on Get Report, we can now export the Reminders Report into Excel or PDF format by clicking on the Actions Button and selecting Export to PDF or Export to Excel.
Job History Report
In this report, you will be able to find the summary of all the jobs assigned to a specific field employee with the following details:
- Customer Name
- Customer Location
- Employee Name
- Job #
- Service Type
- Job Status
- Schedule Date
- Schedule Time
- Actual Time
- Est Duration
- Actual Duration
To view Job History Report, go to Reports Menu on the top>Click Scheduling> on the drop-down click Job History.
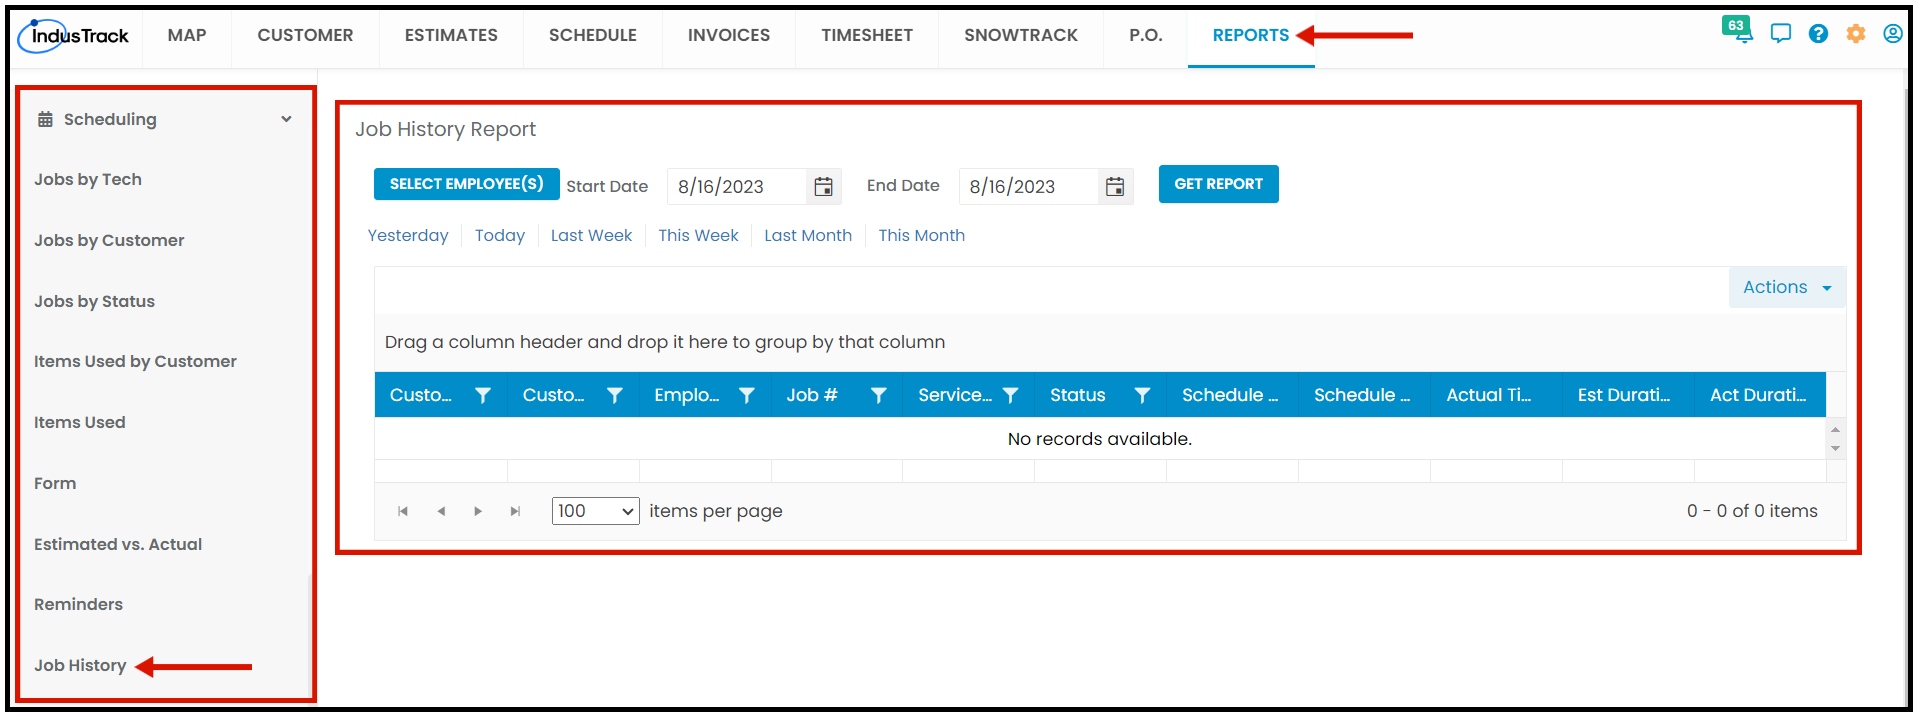
Generate Job History Report
You can filter the report by the following:
- Employees –Name/s of employees
- Click on Select Employee/s
- You have the option to either select one certain employee, multiple employees, by group, or select all employees.
- Date/s – specific date of the report
- Select the start date and end date
- After you selecte the employee/s and the start and end date, click on Get Report.

After we click on Get Report, we can now export the Job History Report into Excel or PDF format by clicking on the Actions Button and selecting Export to PDF or Export to Excel.
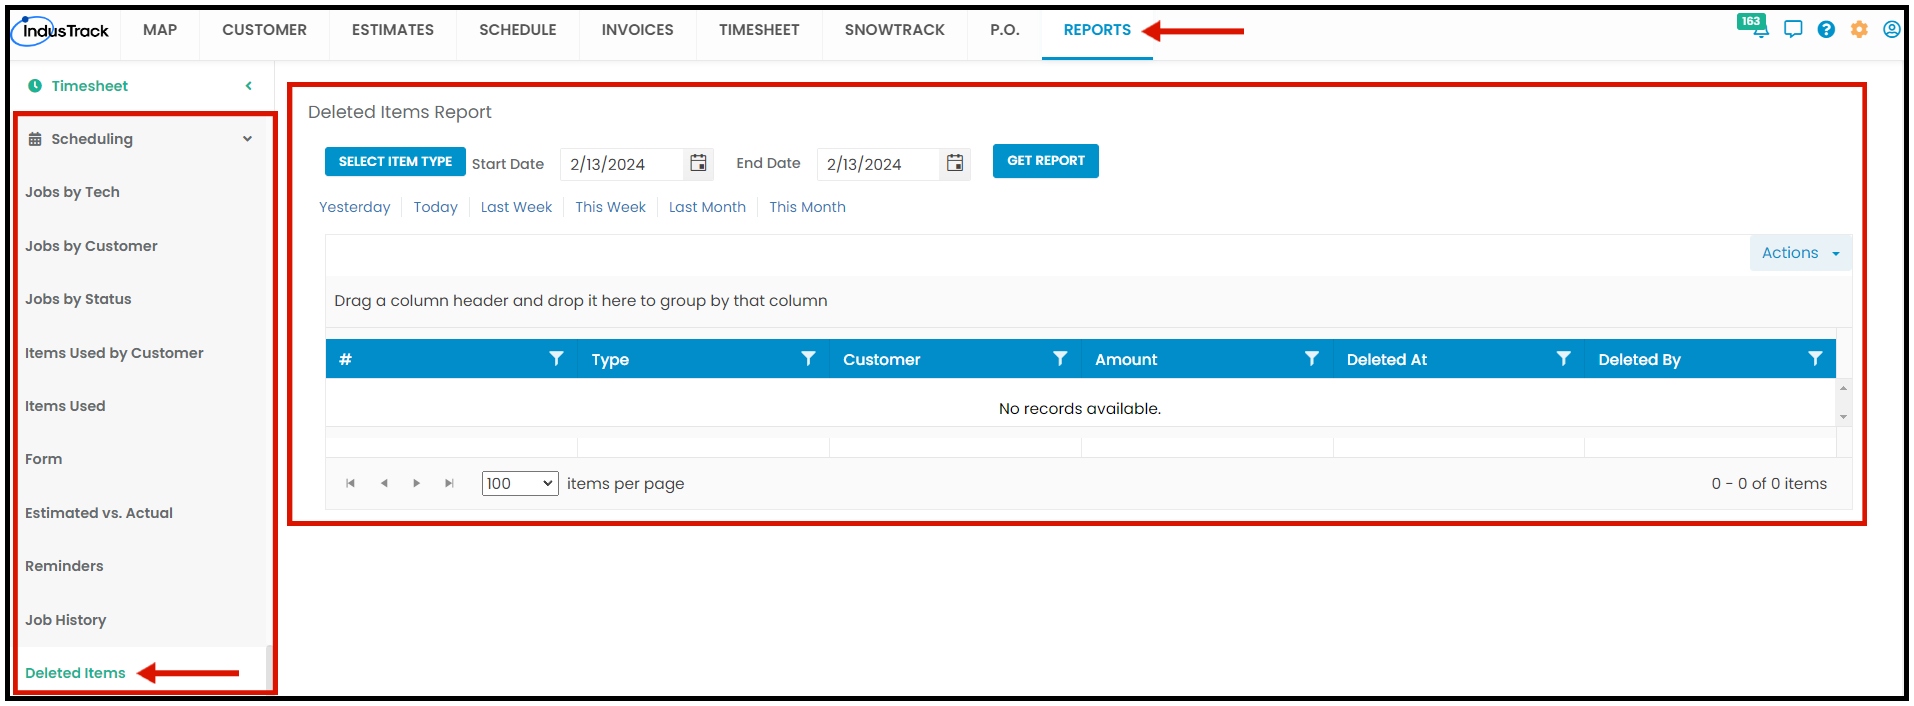
Deleted Items Report
In this Report, you will be able to generate deleted items, such as Jobs, Estimates, Invoices, Customers, and Purchase Orders. You will be able to see who deleted them and when they were deleted with the following details.
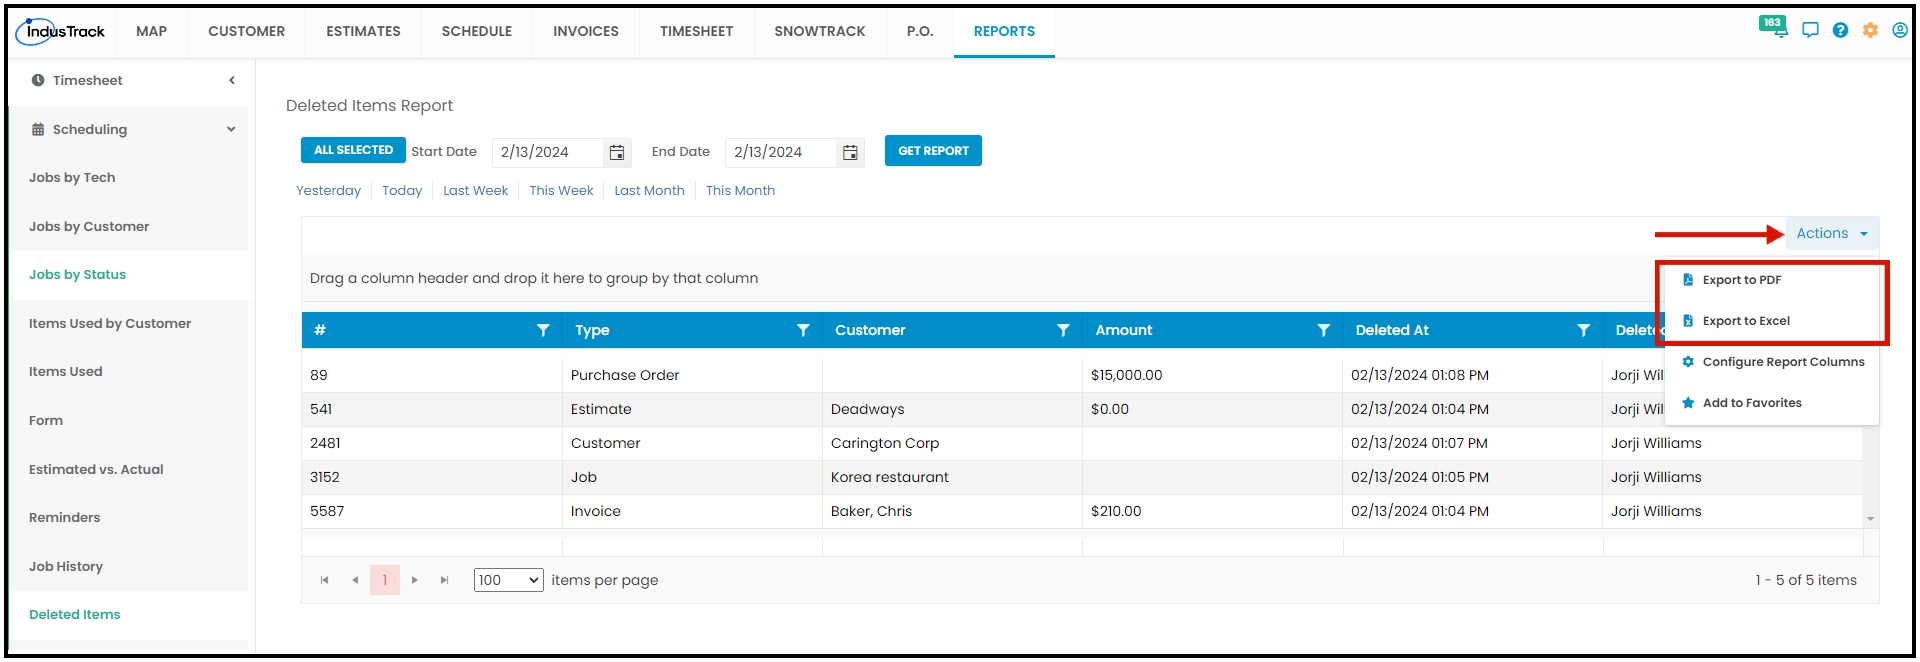
- Number – Job Number, Estimate Number, Invoice Number, Customer Number, or Purchase Order Number of the deleted item.
- Type – Deleted item type ( Job, Estimate, Invoice, Customer, and Purchase Order)
- Customer – Customer Name
- Amount – Total amount of the deleted item.
- Deleted At – Date the item was deleted.
- Deleted By – Name of the user who deleted the item.
To view the Deleted Items Report, go to Reports Menu on the top>Click Scheduling> on the drop-down click Deleted Items.


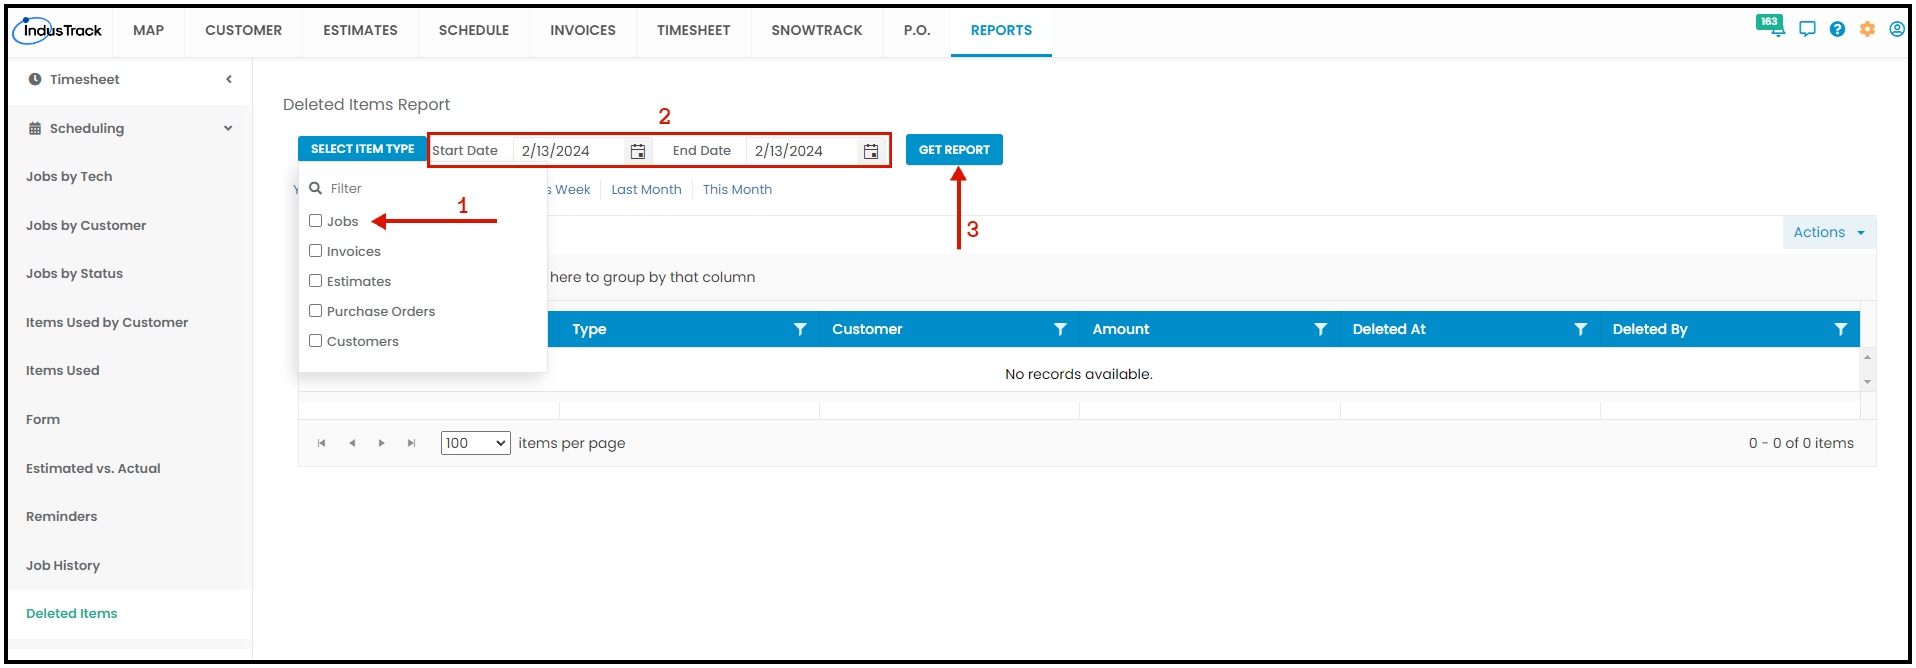
Generate Deleted Items Report
You can filter the report by the following:
- Select Item Type – Customer, Estimate, Invoice, Purchase Order, or Job.
- Click on Select Item Type
- You have the option to either select one item type, multiple item types, or select all.
- Date/s – The date when the item was deleted.
- Select the start date and end date
- After you select the Item Type and the start and end date, click on Get Report.
After we click on Get Report, we can now export the Deleted Items Report into Excel or PDF format by clicking on the Actions Button and selecting Export to PDF or Export to Excel.
0 Comments