Add Field Employees and Assign Permissions
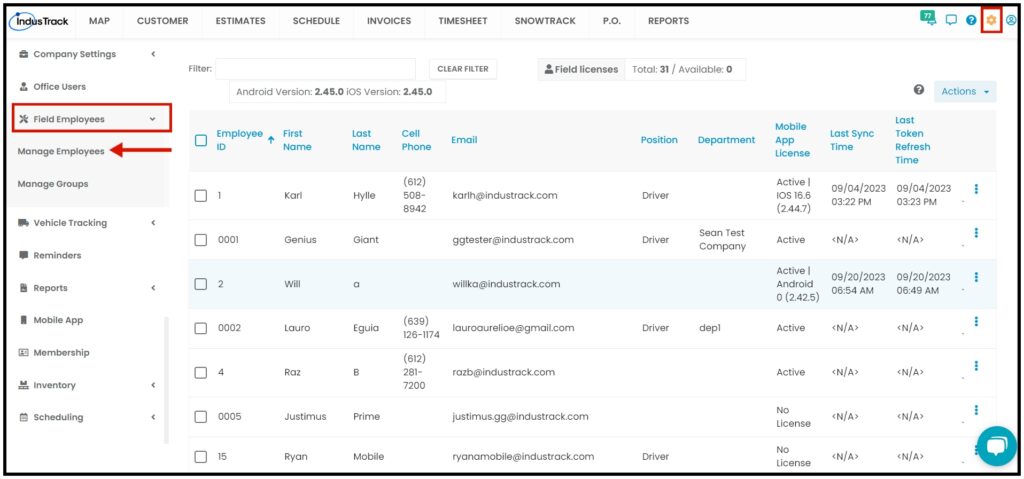
To manage Field Employee profiles and permissions go to Settings > Field Employees > Manage Employees.
Create a Field Employee
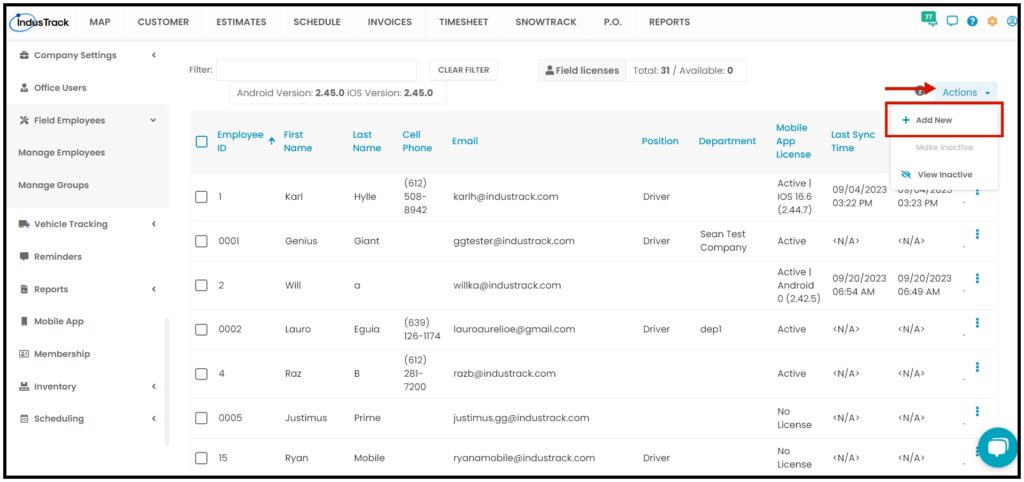
From the Manage Employees page, go to the Actions button and select + Add New button.
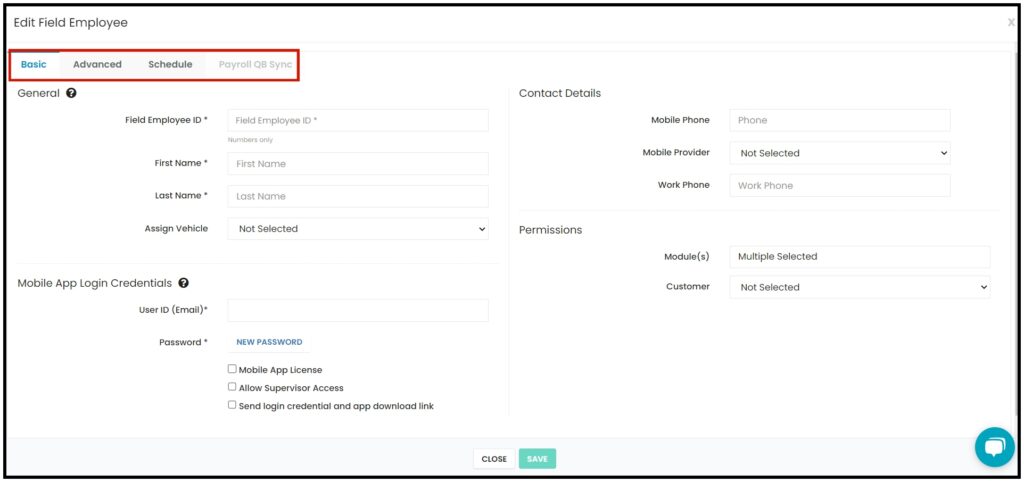
The Add/Edit Field Employee page has 4 tabs:
- Basic – Create the profile, assign permissions, and set up the field employee’s mobile app license.
- Advanced – Add other work information in this tab including the role, rate per hour, license expiration, and others. Upload a photo of the Field Employee from this tab as well.
- Schedule – Set up the Field Employee’s weekly work schedule in this tab.
- Payroll QB Sync – When QB integration is set up, assign Payroll Items from QB to each employee to sync timesheet entries. This tab is greyed out if QB integration is not set up.
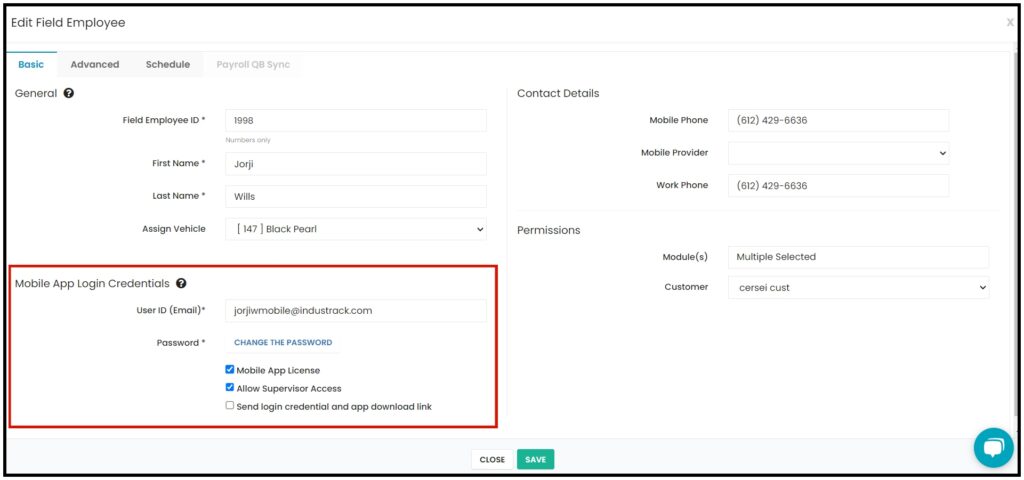
Basic Settings
Go to the General tab, and fill in the fields to create the field employee’s profile. Fields with (*) are required.
- General Information
- Field Employee ID* – Key in a numeric ID number to be assigned to the field employee.
- First Name*
- Last Name*
- Assign Vehicle – If applicable, select the vehicle from the drop-down menu. The vehicles are set up under the Vehicle Tracking settings.
- Contact Details
- Mobile Phone – Information must be provided for the user to receive text alerts.
- Mobile Provider – Select the applicable one from the drop-down list. The information must be provided for the user to receive text alerts.
- Work Phone
- Mobile Phone and Mobile Provider must be filled out for the field employee to receive text notifications

- Mobile App Login Credentials
- Fill in the details of the Mobile App Login Credentials section.
- User ID (Email)* – Enter the field employee’s email address. Does not need to be a valid email address, just an email address format, though a valid email address is required for emails via the messaging module or for Send login credentials and app download link.
- Password* – Assign a password for the field employee.
- Tick the checkbox if any of the options below are applicable:
- Mobile App License – To assign one of the available licenses to the Field Employee. You need to have an available Mobile App License to be able to assign one.
- Send login credentials and app download link checkbox – Username, password, and a link to download the app will be sent to the email indicated above.
- Allow Supervisor Access – Select this if the user will be assigned as a supervisor. This is required to assign this user as the supervisor of a Field Employee group or team.
- Fill in the details of the Mobile App Login Credentials section.
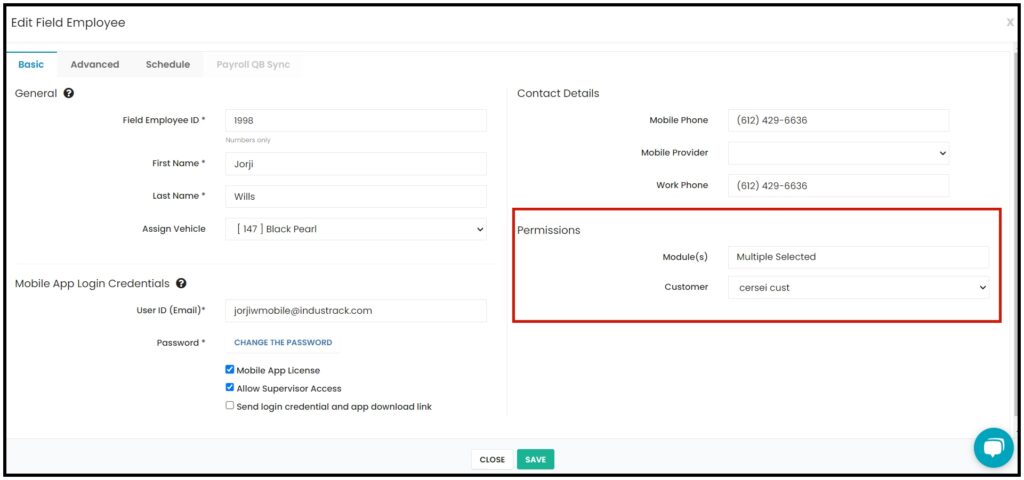
Assign Module Permissions
- Enable the permissions for the mobile modules that the field employee will have access to.
- Tick the checkbox for All to enable view access for all modules.
- Untick all the checkboxes to provide No Access to all modules.
- Select and tick the checkboxes of the modules to be given access to.
Modules
- Estimation – If enabled, the user will have access to the estimation module from the app, and he will be able to create, send via mail, mark the estimate won or lost, convert the estimate to an invoice or a job, copy, sign, or delete.
- Forms – The user will have access to the Forms Module and can see all the pre-created forms, he can save and submit the form, make edits to the saved forms, send the form via email, he can also view the history of when the forms were used for the last 30 days.
- Inventory – If given access, they will be able to access the Inventory Module, where they can see all inventory lists, create a new inventory item, view and create purchase orders, and view and check in/out tools list.
- Invoices – If enabled, the user will have access to the Invoice module from the app, and he will be able to create, send via mail, receive payments and mark invoices paid, copy/clone, sign, or delete.
- Map – Will permit users to access Map Module, users will be able to see vehicles and field employees’ actual locations.
- Payment Processing– This permission is a sub-permission for the Invoice, the Invoice permissions need to be enabled first for this permission to apply. When Payment Processing is enabled, users will be able to receive invoice payments via cash, check, or card from the app.
- Warehouses – This permission is a sub-permission for the Inventory, the Inventory permissions need to be enabled first for this permission to apply. When Warehouses is enabled, users will be able to see the list of warehouses and select which warehouse they want to take the inventory item from.
- Inventory Tracking with QR/Bar Codes – This permission is a sub-permission for the Inventory, the Inventory permissions need to be enabled first for this permission to apply. When Inventory Tracking with QR/Bar Codesy is enabled, this will allow users to scan inventory items using QR/Bar Codes.
- Custom Proposals – This permission is a sub-permission for the Estimation, the Estimation permissions need to be enabled first for this permission to apply. When Customer Proposals is enabled, users will be able to customize estimates.
- Customers – If enabled the user will have access to the Customer Module. The user can see all the customer lists and locations, create a new customer, view customer history for the last 30 days, and view jobs, estimates, invoices, equipment, attachments, and notes associated with the customer.
- Basic Inventory – This permission is a sub-permission for the Inventory, the Inventory permissions need to be enabled first for this permission to apply. When Basic Inventory is enabled, this will only allow users to create and view inventory items.
- Scheduling – The user will have access to the Job Module. In this module, the user will be able to see and work on all the jobs assigned to him through different views (Day, Week, Month, Customize). Users will be able to create a new job from this module as well.
- Timesheet – The user will have access to the Timesheet Module. In this module, the user will be able to clock in/ clock out.
- Snow – The user will have access to the Snowtrack Module, which will allow the user to start snow jobs such as Plowing, Sidewalk, and Salt.
Assign Customer Permissions
- If you want your field employee to only see specific customers on the app, you can group those specific customers and they will be available to be selected here.
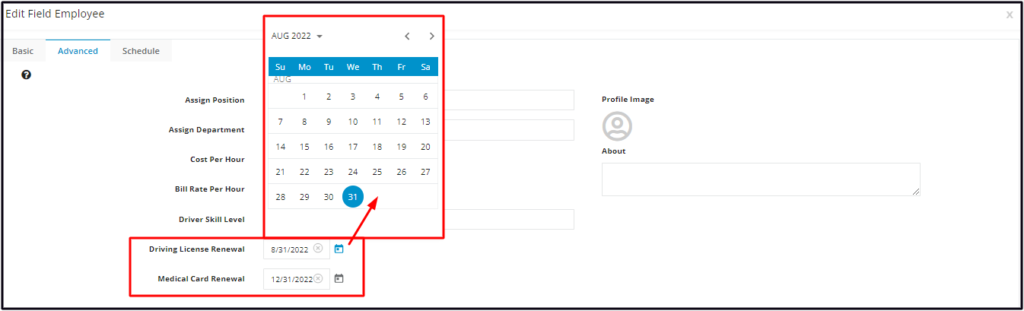
Advanced Settings
Go to the Advanced tab and fill in the fields to add more information on the field employee’s profile.
- Assign Position
- If the position has been entered before, select it from the dropdown list.
- If the position has not been entered before, enter this on the field.
- Assign Department
- Cost per Hour – This value will be used for calculating pay.
- Bill Rate per Hour – this is what you charge customers for this field employee time
- Driver skill Level
- Driving License Renewal – This refers to the expiration date of the field employee’s driver’s license. An automated Reminder is sent out if this information is provided and the Reminder is properly set up.
- To add a date, use the date picker.
- To delete a date, use the X button next to it.
- To update/edit the date, select another date from the date picker.
- Medical Card Renewal – Similar to the driving license renewal reminder, one is also sent out for Medical Card renewals.

Upload the field employee’s image or photo. You can upload a photo of the field employee or his ID or Driver’s license.
- To add a photo, click on the image and select Upload Image. Choose the image and upload it.
- To edit/change the photo, click on the image and select a different image.
- To delete a photo, click on the image and select Delete Image.

Write something about the field employee on the About field. This, along with the photo, is a field which can be included in automated customer notifications so the customer knows a little about the tech who is coming to provide service.
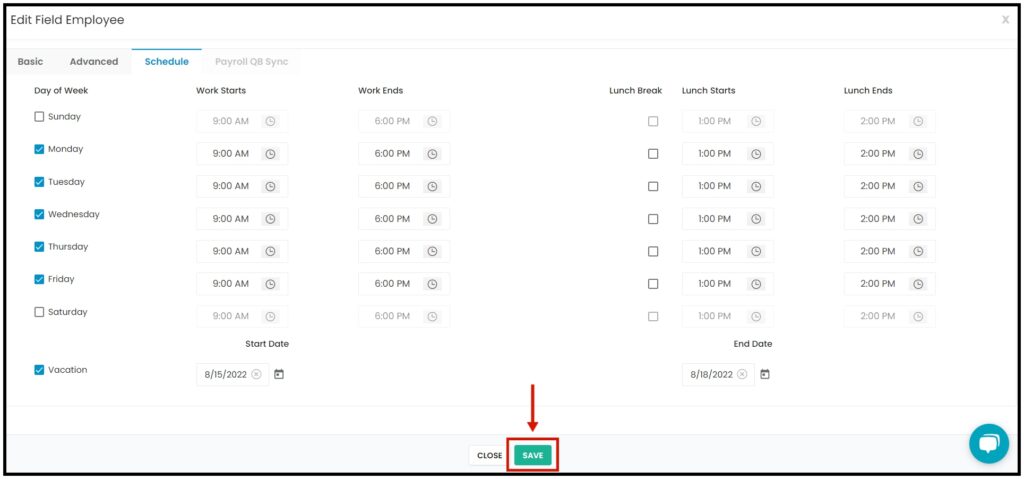
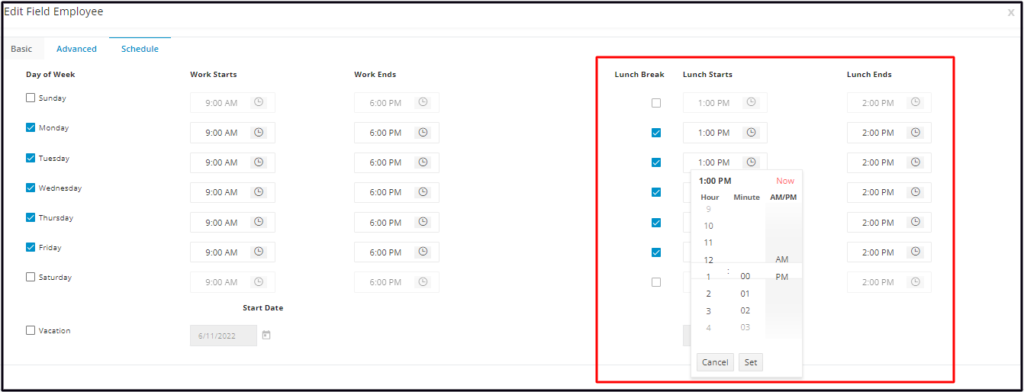
Schedule Settings
Set up the field employee’s weekly work schedule for capacity planning.
- Day of the Week – Select the days that the field employee will be on duty.
- Work Starts and Work Ends – For each of the days selected, set the work start and end times. Directly edit the default time or use the time picker.
- The time pickers are enabled only when the day is selected. You will not be able to set or edit the times if the day of the week is unticked.
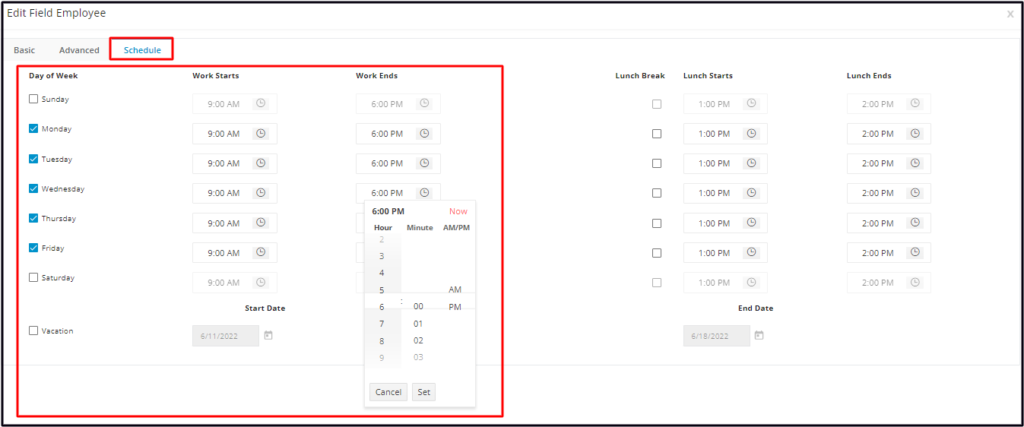
- Lunch Break – Select the days that the field employee is entitled to a break time. The checkboxes are enabled only when the day is selected.
Lunch Starts and Lunch Ends – For each of the Lunch Breaks selected, set the lunch start and end times. Directly edit the default time or use the time picker.
- Vacation – Select this option if the field employee has a scheduled vacation time. This will automatically remove the field employee from the schedule.
Vacation Start and End Dates – Set the inclusive dates of the vacation. Use the date picker. - To set a future date, select the End Date first. The start date can not be set if this is after the indicated end date.

Save the New Field Employee Profile
Use the Save button at the bottom of the Add Field Employee window to create the new User. The user will be added to the Field Employees list.