Add and Manage Vehicle Alerts
To create and manage Vehicle alerts, go to Settings > Vehicle Tracking > Alerts.
Create Vehicle Alerts
From the Vehicle Alerts page, go to the + Add New button.

Complete the information on the Add/Edit Alert window. Fields with (*) are required.
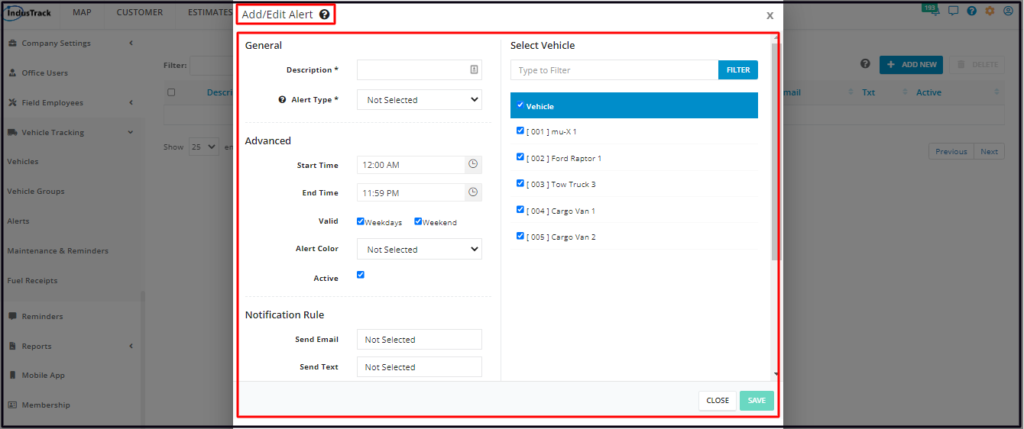
General
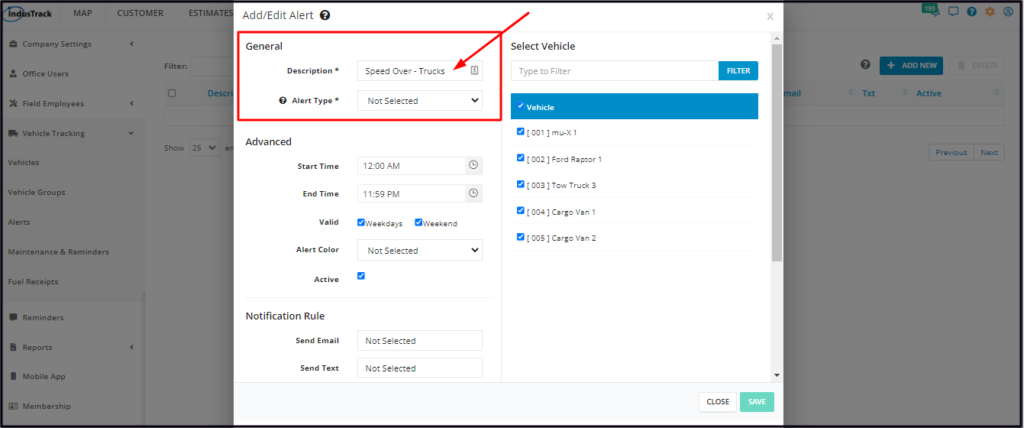
- Description*
- Give the alert a name. This could be a very short description of the alert which will quickly identify it from similar alerts.
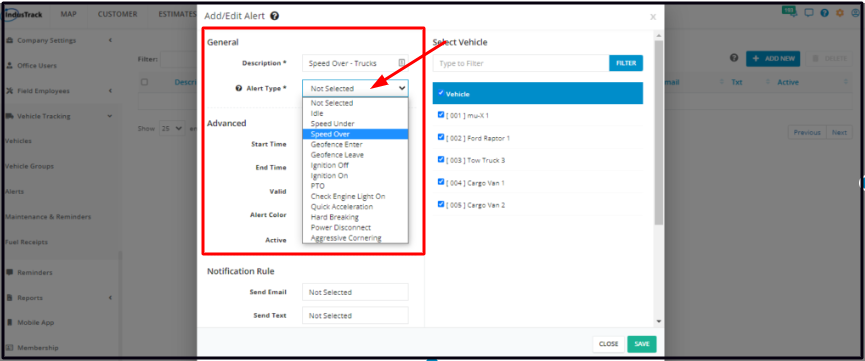
- Alert Type*
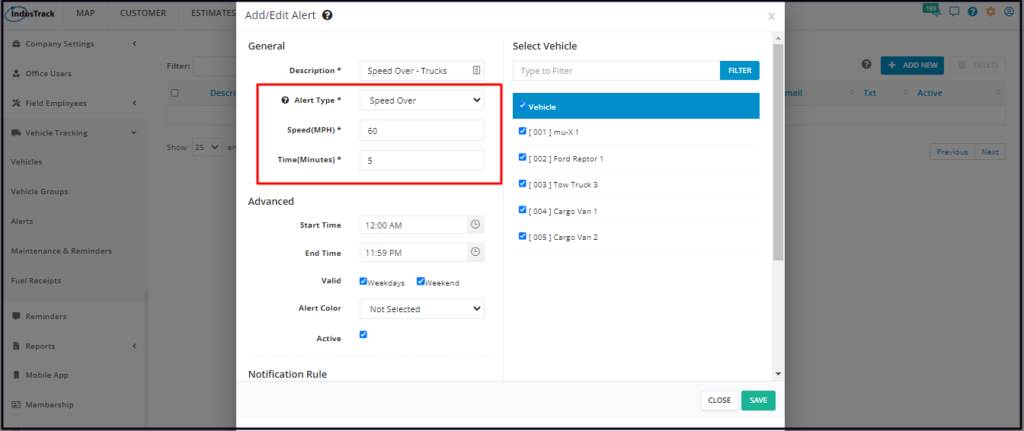
- Select the alert type from the drop-down list. Depending on the selected type of alert, additional fields will come up, such as Time if the type Idle is selected Find the descriptions of the different alert types and the additional fields that will come up in this article.
Advanced
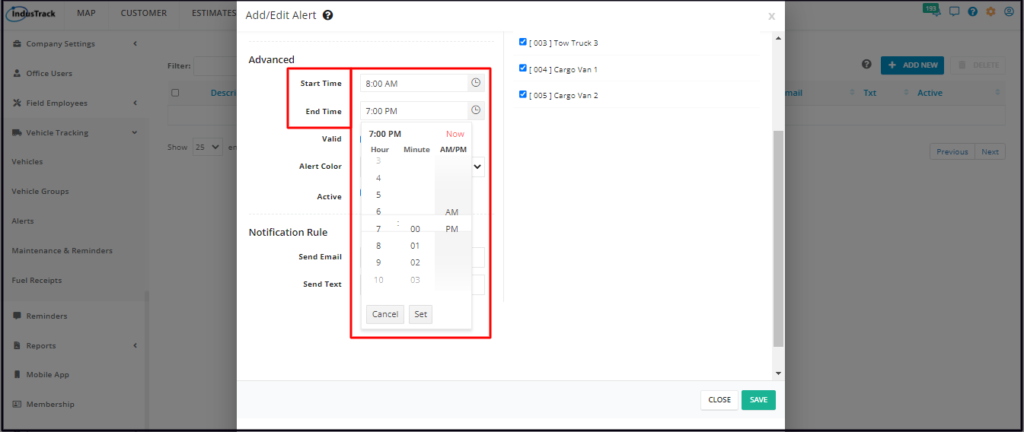
- Set applicable times.
- Set the applicable times of day (set both the start and end times) when the alert will be valid.
- Setting the start and end times will limit the trigger of the alert. If the event happens before or after the set times, the alert will not trigger.
- For both start and end times, set the hour, minute and the 12-hour clock system (AM or PM). To set, you have 2 options:
- Manually key in the time on the field.
- Use the time picker by clicking on the clock icon. Select the time and click the Set button to pull the time.
- Set the applicable times of day (set both the start and end times) when the alert will be valid.
- Set applicable days.
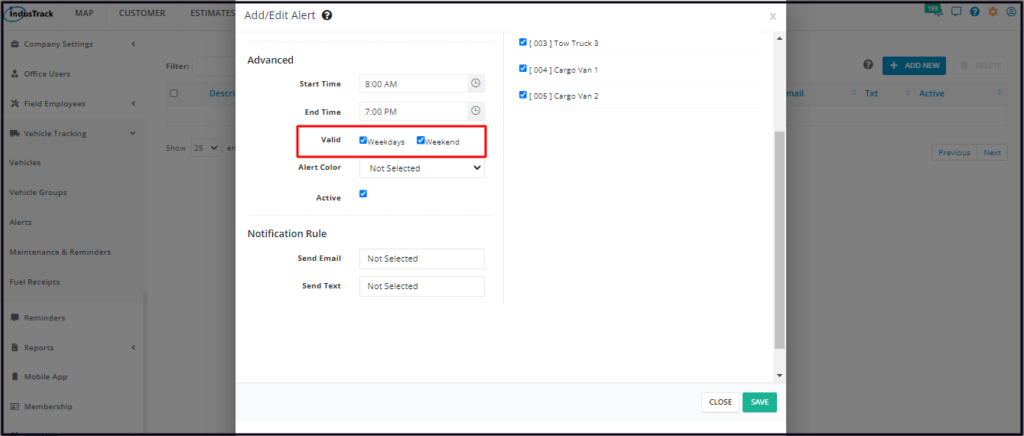
- Set the applicable days of the week when the alert will trigger.
- Tick the checkbox for weekdays and leave the checkbox for weekends unticked to set the alert to trigger only on weekdays.
- Tick the checkbox for weekends and leave the checkbox for weekdays unticked to set the alert to trigger only on weekends.
- Tick the checkboxes for both weekdays and weekends to set the alert to trigger on all days of the week.
- Set the applicable days of the week when the alert will trigger.
- Set the Alert Color.
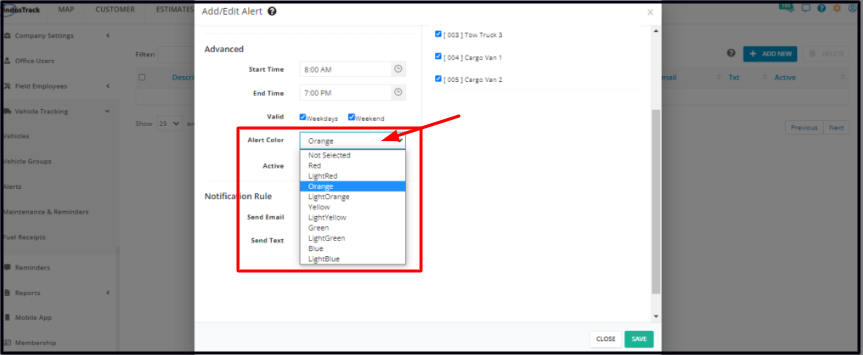
- Select the preferred alert colour.
- When the alert triggers, a notification will appear on the Alert Window of the Map. These notifications will be colour-coded. The colour of the specific alert notification will be based on the selected Alert Color.
- All vehicle alert notifications with no colours are assigned the default colour of white.
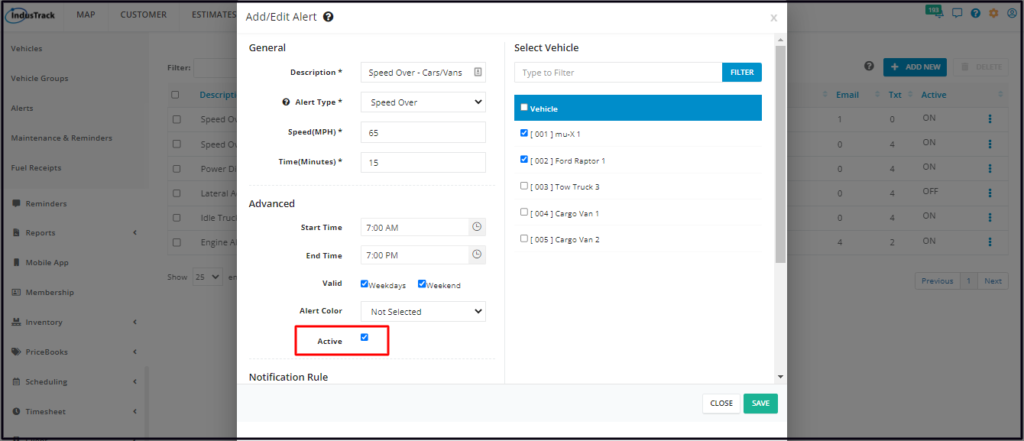
- Activate the Alert
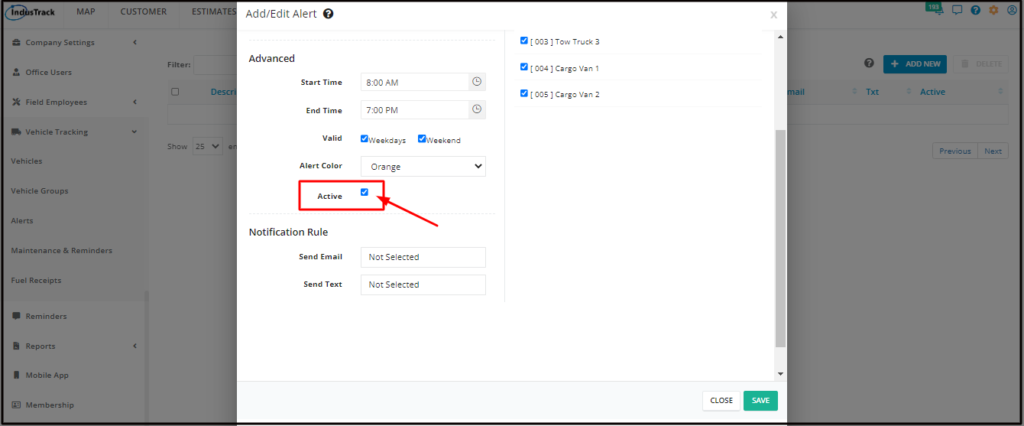
- Tick the checkbox for Active. If this is not ticked, the alert will not trigger.
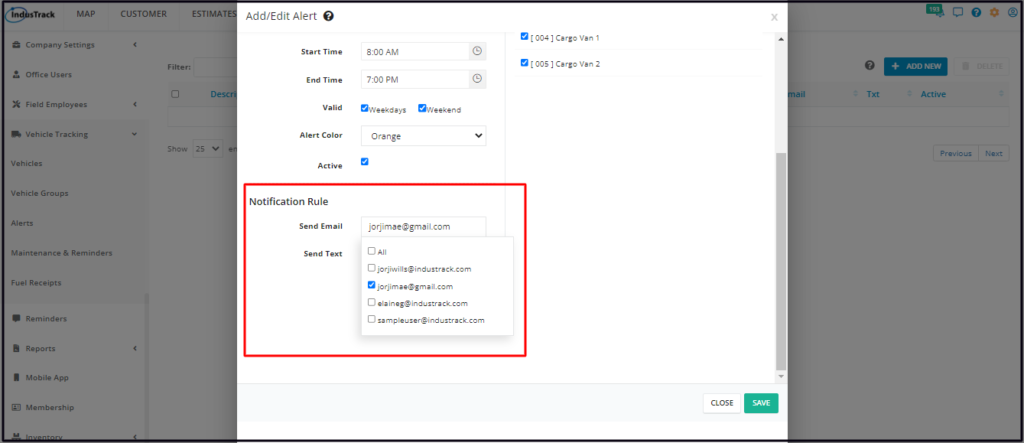
Notification Rule
In addition to the alert appearing on the Alert Window of the map, an email or text notification can also be sent when the alert is triggered. The notification can be sent via text, email or both.
- On the Send Email field, select the email address or addresses that will receive the alert notification.
- On the Send Text field, select the phone number or numbers that will receive the alert notification.
Apply the Alert to Vehicles
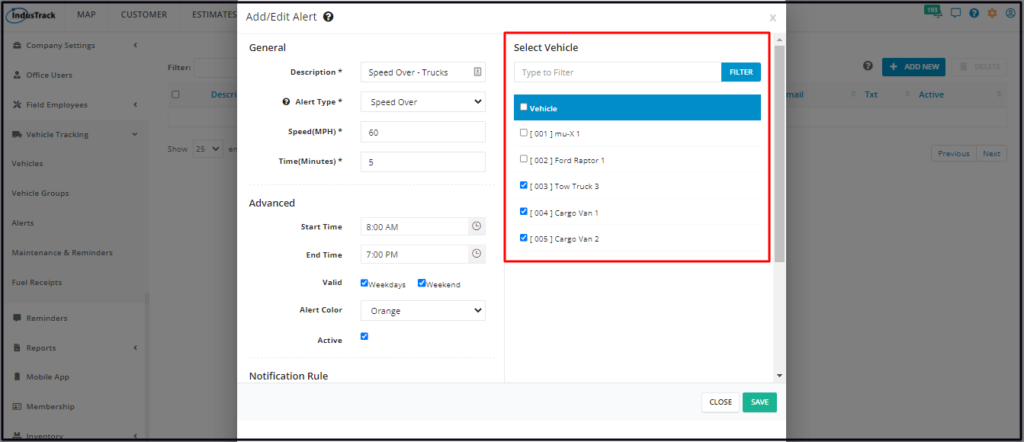
Vehicle Alerts can be applied to all of your company’s vehicles, to specific types of vehicles or to a single-vehicle. You have the option to set the rule and apply alerts for each of your vehicles.
- To apply to a single vehicle, find the Vehicle from the list under Select Vehicle. Tick the checkbox to its left.
- To apply to multiple vehicles, find each of the names of the Vehicles from the list under Select Vehicles. Tick checkboxes as you go along.
- To select all vehicles on the list, tick the checkbox of “Vehicle”. This will auto-select all of the vehicles.
- If you have a long list of to go through, use the Filter bar to quickly find the vehicle.
- Key in the Vehicle’s name (or part of the name) or ID number on the Filter field.
- Click Filter. The list will be narrowed down to the names that match your filter.
Save the new Vehicle Alert. This will be added to the list of Vehicle Alerts.

Update/Edit Vehicle Alerts
- Find the alert from the list and click the 3-dot menu to its right.
- Select Edit. This will open the alert details window.

- Update the vehicle alert as needed. Save the changes once done.
Reactivate/Switch On a Vehicle Alert
Deactivated Vehicle Alerts can be reactivated at any time.
Find the alert to be reactivated/switched on from the list, click the 3-dot menu to its right and select Turn On.

The alert’s status will be updated to ON on the list and Active on its profile.

Review and Update the Vehicle Alert as may be needed.
Switch Off a Vehicle Alert
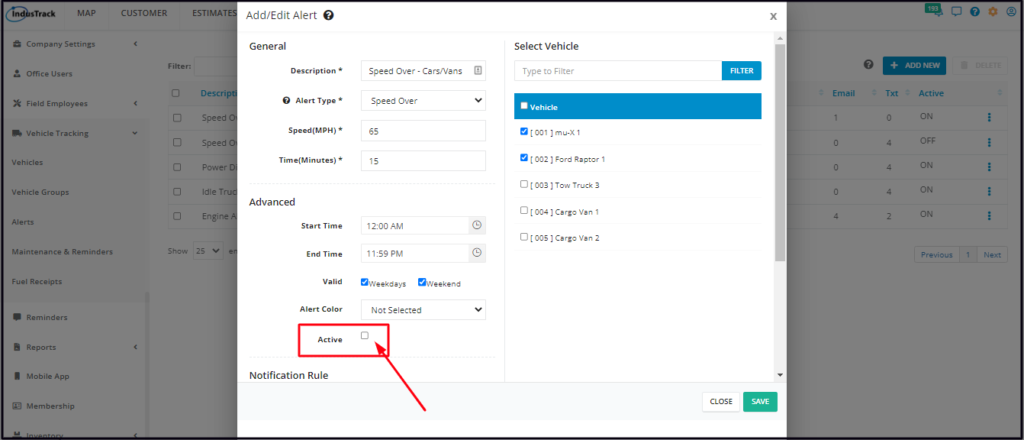
Instead of deleting a vehicle alert, you have the option of deactivating or pausing it. This way you can quickly reactivate it if needed.
- Select the alert to be switched off.
- Click the 3-dot menu to its right and select Turn Off.

The alert’s status will be updated to OFF on the list and Inactive on its profile.

Delete a Vehicle Alert
Delete an alert if this is already an obsolete alert or was created in error. It is wise to exercise caution when using this function. Deleting a vehicle alert may have an effect on other functions, settings or data.
- Select the vehicle alert to be deleted.
- Click the 3-dot menu to its right and select Delete.

A warning window will come up. Click the OK button to continue with the deletion and Cancel to abandon the action.

The vehicle alert will be removed from the list.

Delete Multiple Alerts
To delete multiple alerts, tick the checkboxes to the left of all those to be removed. Click the Delete button.

The warning window will come up. All selected alerts will be deleted and removed from the list once confirmed.
Delete All Alerts
If all Vehicle Alerts will be deleted, just tick the checkbox of the Name header and click the Delete button.

The warning window will come up. All alerts will be deleted and removed from the list once confirmed.